Fanning allows you to assign a parameter across several fixtures, so that the parameter values are equally spaced. For example, if you have five fixtures all at 50% intensity, you can use fanning easily to assign intensities of 30, 40, 50, 60 and 70% across five fixtures. Note that in this example, the middle value of the five stays the same, and the end values change the most, while the other values change proportionally.
You can fan any values including parameters and timings. For example, you can use fanning with position: suppose that you have seven moving lights on an upstage position, all pointing downstage towards the audience. You could fan the Pan parameters so that the centre fixture still points downstage, and the others turn progressively out to stage left and right.
The fixture selection order is significant when fanning; see Selection Order. The value change when fanning is always relative to its current value; if there is no current value the parameter will fan from its default value.
Tip: Choosing the initial, or ‘base’, value is important when fanning, as the parameter values cannot go below 0% or above 100%. Make sure that you leave enough of the value range for the value to fan into.
To fan a parameter:
To fan a parameter:
You can also fan backwards; continuing the above example:
You can also fan several columns at once, fanning both Pan and Tilt for example.
To fan intensities from the command line:
1 Thru 5 @ 10 Thru 50, Enter : The fixtures at either end of the range take the values 10% and 50%, with those in between evenly spread across the intervening range.
You can also fan backwards:
1 Thru 5 @ 5 Thru 10, Enter : fixture 1 has an intensity of 50% and fixture 5 an intensity of 10%.
By default, fanning adjusts parameter values proportionally from the center of the fixture selection. You can have fanning work in other ways:
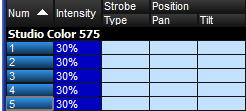
Fan Normal: As described above, the middle fixture remains unchanged, while the first and last fixtures' values change the most, in opposite directions. For example:
|
Before fanning: |
30 |
30 |
30 |
30 |
30 |
|
After fanning: |
10 |
20 |
30 |
40 |
50 |
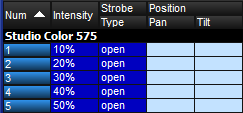
Fan From Start: The first fixture in the selection order remains unchanged, while the last one's value changes the most. For example:
|
Before fanning: |
30 |
30 |
30 |
30 |
30 |
|
After fanning: |
30 |
40 |
50 |
60 |
70 |
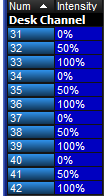
Fan From End: The last fixture in the selection order remains unchanged, while the first one's value changes the most. For example:
|
Before fanning: |
30 |
30 |
30 |
30 |
30 |
|
After fanning: |
70 |
60 |
50 |
40 |
30 |
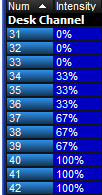
Fan To Center: the middle fixture remains unchanged, while the first and last fixtures' values change the most, in the same direction. For example:
|
Before fanning: |
30 |
30 |
30 |
30 |
30 |
|
After fanning: |
50 |
40 |
30 |
40 |
50 |
You can set the fanning mode from the Fanning Toolbar as shown below.
Press and hold the Fan key to display the Fanning Toolbar
All subsequent fans will follow the currently selected fanning mode, until the editor is cleared.
The fanning toolbar

With the command line, you can enter multi-part fanning:
1 Thru 9 @ 10 Thru 50 Thru 10 : The fixtures at either end of the range take the value of 10%, that in the middle 50%, and the others spread between:
|
10 |
20 |
30 |
40 |
50 |
40 |
30 |
20 |
10 |
You can fan in as many parts as you want, separating values with the Thru key. Note that multi-part fanning only works with the command line, not when editing values in the spreadsheet.
Segmenting and buddying allows you to control the way that parameters are fanned to make complex patterns. The Segments... button on the main toolbar reflects the current segment / buddying settings of the console. To change segment and buddying settings press the Segments... button on the Main Toolbar. A Segments and Buddying toolbar will then appear. Press Enter or click on the toolbar Close button when you have made your selection.
The Segments Toolbar

The segments toolbar displays the current segment and buddying size and has buttons to increase and decrease the segment size and the buddying. There are also shortcuts for common segment sizes and options for nexting by segment and buddying parts.
Note that segments and buddying are only used during fanning; segment and buddying information is not recorded into cues and palettes; only the resulting parameter values are recorded.


Tip: By default the segment and buddying options are retained even after pressing the Clear key. To reset the segment and buddying options when Clear is pressed, enable the option in Setup → Preferences → Programming.