
Up to 8 MIDI Timecode input devices can be mapped to a console (or Hog 4 PC). When MIDI Timecode is received by a console or Hog 4 PC it is also automatically available to all consoles connected to the show.
Follow these steps to connect and configure a MIDI timecode device on a console:
To view incoming timecode for a specific MIDI device navigate to the MIDI Timecode tab of the Console Settings window and enable the "View Timecode Toolbar" button on the appropriate device mapping.
The timecode toolbar can also be displayed for a MTC device by pressing the View Timecode button at the top of the master window for any cuelist that is assigned to receive timecode from that device.
The Timecode Toolbar displays the incoming timecode type, format, value, and frame regeneration. Frame Regeneration occurs when the console does not receive a clean timecode signal and must make up for the missing frames in order to prevent missed cues. You can set how many frames of timecode are generated by the console before timecode is lost in the timecode settings window by clicking on the word movie slate icon in the timecode toolbar.

Once a MIDI device is configured in a show, it can be assigned as the timecode source for one or more lists.
To assign a MIDI device as the timecode source for list 1 follow this procedure:
List 1 Open
Press the Options button located at the top left of the list window to open the Playback Options Window for the list.
Select the Cuelist tab of the Playback Options window.
Use the Timecode Source drop down menu to choose a MIDI device as the timecode source. Note: In order for a MIDI device to be shown in the timecode source drop down menu it must first be configured (see sect 21.4.1)
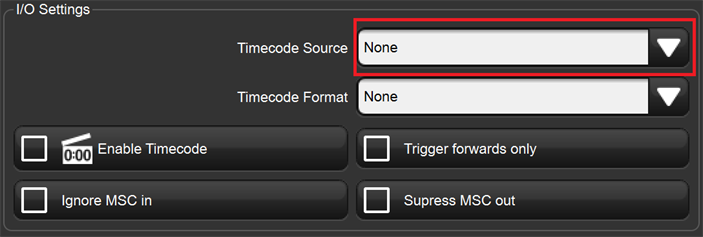
Toggle on the Enable Timecode button to activate the MIDI timecode source for the list.
Tip: The Enable Timecode button at the top of a cuelist's master window allows for quick enabling and disabling of timecode input for that specific cuelist.
The timecode frame rate of a list can be set to 24, 25, or 30 FPS. The default value for new lists is 30 FPS. The frame rate is an important list setting as it alters how the console parses edits made to the timecode values for cues. For example, entering a timecode value of 00/00/12.28 when the timecode frame rate is set to 25 FPS will result in a stored timecode value of 00/00/12.24 since there are only 25 frames per second under the 25 FPS setting.
To modify the timecode source for list 1 follow this procedure:
List 1 Open
Press the Options button at the top left of the list window.
Select the Cuelist tab of the Playback Options window
Use the Timecode Frame Rate drop down menu to choose a frame rate.
Please Note: Changing the timecode frame rate of a list will alter all of the timecode values for cues in the list so that they conform to the new frame rate.
To manually add/edit a timecode value for a cue in list 1:
List 1 Open
Select the Wait cell for a cue in the list and press the Set key
Enter a timecode value in hours, minutes, seconds and frames, in the form hh/mm/ss.ff
Press Enter to confirm.
To automatically stamp timecode values into the wait column for cues as the list is manually played:
Toggle on the Learn Timing button at the top of the list window
Toggle on the Enable Timecode button at the top of the list window
Start the timecode
Play through the cues in the list in the desired timing
When each cue completes its cross-fade a timecode stamp will appear in the wait column for the cue
To manually edit the timecode values for a range of cues in list 1:
List 1 Open
Click and drag on the wait cell column for the desired range of cue and press the Set key
Modify the timecode value of the first cell in the selected range and press Enter
The first cell in the selected range will use the newly entered timecode value; all of the subsequent timecode values will be shifted based on the delta between the old and new value of the first cell that was edited.
For example, you might have a series of cues in list 1 where each one is triggered by timecode one second after the previous one. If the timecode value triggering the first cue needs to be increased by 12 frames, you may want the values for all the subsequent cues to also be increased by 12 frames to maintain the 1 second separation. Hog 4 OS allows you to do this easily:
List 1 Open
By default, a timecoded list will synchronize its timecode source as the clock moves forwards and backwards. To prevent a list from going to an earlier cue when the timecode source goes to an earlier clock value enable the "Trigger Forwards Only" option for list 1.
List 1 Open
Press the Options button at the top left of the list window.
Select Trigger Forwards Only.
You can temporarily simulate MIDI timecode on the console using the Timecode Toolbar.
To simulate MIDI timecode:
TIP: Using the jump toolbar you can jump the simulated timecode value to six different jump points. To change the jump points click on the word "TIMECODE" on the far left hand side of the timecode toolbar. A drop down menu will appear with a set of fields allowing you to change the simulated jump points.