Open topic with navigation
Start a New Configuration
There are multiple ways to start a new configuration:
- Select "Start a new configuration" from the initial start up display
- Select (File) "New" from the menu
- Click the [New] icon
 located in the main toolbar
- Press (Ctrl) + (N) from your alphanumeric keyboard
Creating a new configuration launches the New Configuration Wizard for theme selection.
New Configuration Wizard
- Select a theme from the Theme browser or import a theme into the configuration.
- To select a theme from the themes library, scroll the available themes by clicking the [Previous] and [Next] buttons located at the top of the dialog.
- To import a theme that does not currently exist in the library, click the [Import] button. The "Import a theme" dialog displays for selection of a themes file (*.lcdtheme). Browse to and select the file, then click [Open].
The Import function copies the selected theme to the "My Documents/Paradigm Themes" directory on your computer. Custom or any non-standard themes must exist in this location for both LightDesigner and ControlDesigner to both access and share them.

- After selecting or importing the theme, click the [Continue] button located at the bottom of the display. The wizard advances to the next dialog for configuration screen size resolution and configuration name specifications.
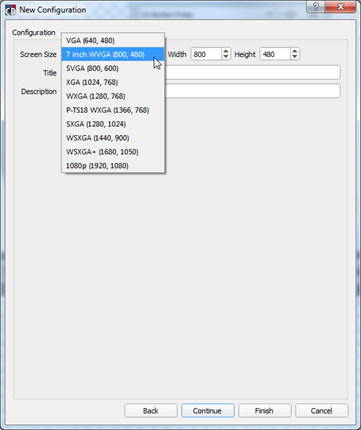
- If the new configuration is for use on a Virtual Touchscreen (VTS), specify the "Screen Size" from the available settings in the drop down menu or specify the screen resolution in pixels using the width and height specification boxes.
Systems using P-TSI or VTS to view Energy Management on an external monitor must have a minimum resolution of 1280x768.
- Specify a name that will be used for this configuration in the "Title" field and a brief description as needed in the "Description" field.
- Click [Continue]. The "Page" dialog. displays. The "Page" dialog is split into three tabular sections including "General", "Layout", and "Navigation".
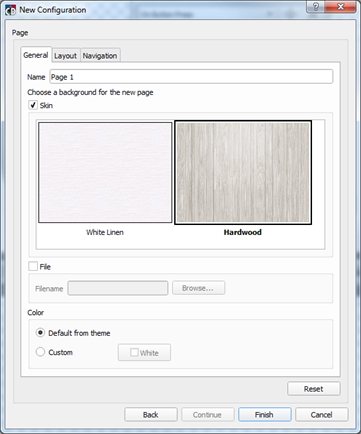
- With the "General" tab in focus, specify a unique name for the first page in the "Name" field. By default, the page is labeled "Page 1".
- Choose a background for the new page.
- Select a background from the skins that are available in the selected theme. A selected skin displays with a black selection box around the image.
- Alternatively, select the "File" checkbox to browse and select a custom skin graphic from another location. ControlDesigner accepts graphic file of type *.png, *.xpm, *.jpg, or *.gif. It is recommended that you do not use images with resolutions higher than that of your configuration.
- From the "Color" section, choose a background color to be used on the page.
- By default, the background color is supplied in the theme and "Default from theme" is selected.
- If you require a color that is different from the default color provided in the selected theme, choose "Custom", then select the colors box for a selection of basic colors and HSV, RGB, and HTML color mixing options. See Page Backgrounds for more information as needed.
Click the [Reset] button to clear the options on the page back to the selected theme defaults.
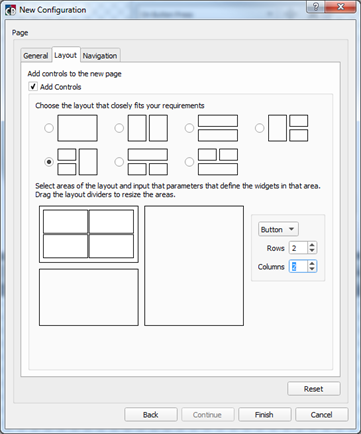
- Click on the "Layout" tab. This display allows you to add controls to the new page you have just created.
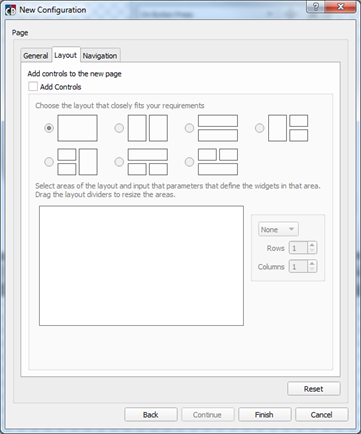
- Click "Add Controls" to enable the space layout templates.
- Choose the layout that closely fits the display requirements for your touchscreen from the template options.
- Click to select an area of the layout and specify the input control parameter that will define the widgets in that area from the drop down box (Button, Fader, or None).
- Also specify how many rows and columns of that input control you want displayed in that particular area of the layout. For instance, two rows of buttons, two columns wide (would equal 4 buttons in total for that specific area).
TIP: You can drag the dividers around to assign the desired proportion of the page to each area.
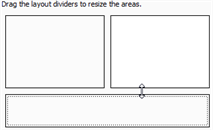
↕
- Repeat steps 12 and 13 for the remaining areas on the page.
- Click on the "Navigation" tab. This display allows you to add navigation buttons (Next, Back, etc.) to the new page you have created. Navigation buttons allow movement between pages of the configuration on the Paradigm Touchscreen or Virtual Touchscreen.
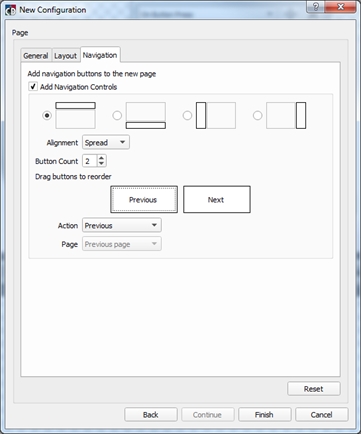
- Click the "Add Navigation Controls" checkbox to enable navigation controls.
- Select the radio button of the page location you want to add the navigation controls.
- Select the alignment for the controls from the options in the "Alignment" drop down box.
- Select the total number of navigation buttons required (limited to 3 total).
- Click to select a navigation button and reassign its control using the options in the "Action" and "Page" drop down boxes .
- As needed, click to select the navigation buttons then drag them to reorder them, resulting in the order they should appear on the page .
 Related Topics