Tabs
A tab is similar to a stack of frames. Tabs are typically drawn across the top or bottom width of a page and used as the visual method to navigate between configured pages in a touchscreen configuration. See Lockout and Visibility and Hiding and Disabling Controls.
After adding tabs to your page, add buttons (typically invisible) onto the tabs and apply an action to the button that changes the page shown.
Add a New Tab
When a tab is drawn on the page, only one tab is created although you can have numerous tabs on a page. When more tabs are created than space allows for display on a page, ControlDesigner automatically creates advance arrows indicating there are additional tabs. To navigate to the off screen tabs press the arrow tab in the direction you wish to move.
- Select the [Add Tab] tool
 from the toolbar. When draw mode is enabled and the mouse is hovered the Page workspace, the mouse changes to a "+" symbol.
 - Simply draw the tab to the size of your choice on the Page workspace. If multiple single tabs (tabs not connected in the same string) are required, you will be able to draw multiple tab's of the same selected type until you exit draw mode or select a new different control type or parent object to add to your configuration. Once drawn, the Property Editor displays available Tab Properties for the selection.
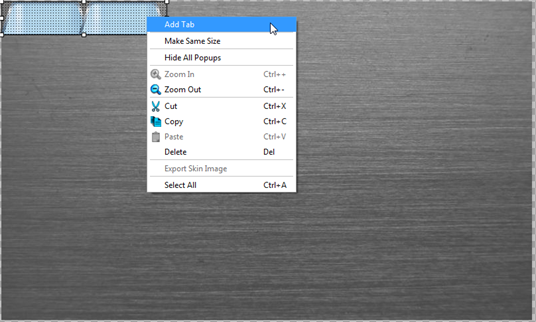
- To add additional tabs to the same string, right-click on the new tab and select "Add Tab" from the context menu.
Note: You may select "Make Tabs Same Size" from the context menu if multiple tabs of varying sizes are selected.
 TIP: The tab can be moved and re-sized after it is drawn so you do not need be completely precise when initially drawing the tab. You can also copy and paste and duplicate a tab, making it easy to create multiple tabs of the same size and location but not in the same string.
Select, Re-size, and Reorganize Tabs
While in Select Mode, select and specify new properties for a tab, reorganize the order of the tabs in the string, and make all of the tabs in the string the same size.
Select Tab
To select a tab while in select mode, you can:
- Click to select a specific tab as it is displayed on the page
- Click the advance arrow to scroll through the tabs in the string. A selected tab displays as highlighted while the other tabs are a darker gray color by default. Also notice the "Current Tab" property in the Property Editor displays the currently selected tab in the string. This property is viewable only.
- Click to select the tab from the listing in the Object Browser.
Re-size Tabs
You can make all of the tabs in the selected tab string the same width as the current selected tab:
- Right-click on the selected tab and select "Make Tabs Same Size" from the context menu.
- With the target tab selected, right-click on the "Tab Widget" name in the Object Browser and select "Make Tabs Same Size" from the context menu.
Reorganize Tabs
At any time, tabs in a string can be reorganized to a different order.
- Right-click on a tab and select "Move Tab Right" or "Move Tab Left" from the context menu.
- Right-click on the "Tab Widget" name in the Object Browser and select "Move Tab Right" or "Move Tab Left" from the context menu.
Delete a Tab
Delete a tab at any time:
- Right-click on the tab name in the Object Browser and select "Delete" from the context menu.
- Right-click on the tab in the Page workspace and select "Delete" from the context menu.
- Click on the tab in the Page workspace and press (Delete) from your alphanumeric keyboard.