Clears unsaved console data and temporary files. A deep clear is automatically performed when new software is installed. Sometimes it is useful to perform a deep clear between updates.
The advantage of deep clear is that you can clear all console data before reloading the console’s current state during start-up. This is helpful if you are moving a new console onto the network and don’t want it to suddenly take control of a system or if you somehow end up with a corrupt show file that is causing issues upon start-up.
Note: Deep clear does not reset any ECU settings.
Removes extraneous files such as temp files, logs, and diagnostics to free up disk space.
Displays a dialog box prompting you to save the console log files for troubleshooting purposes.
By clicking on the {Advanced} button, you can select or deselect any of the various individual log files to be saved.
Clicking {Next} you will be able to provide additional information, the date, and time of the issue.
Clicking {Next} again you will see a drop down menu to select the target export location from any available write-enabled removable media such as a USB drive.
If you experience software problems with your system that we are unable to reproduce, sending these log files to ETC Technical Services (see Help from ETC Technical Services) can help us isolate the issue.
Allows you to either backup the most current version of each show file or every version of each file to a USB drive.
Allows you to restore show files from a USB drive.
Allows you to backup all ECU settings, including Net3 services. {Backup System Settings...} will open a window that allows you to save an .ini file to a selected drive. To backup settings, select a drive from the drop down menu, and press {Accept} to save or {Cancel} to exit without saving.
Open a window that allows you to select a saved.ini file. Select the desired file and press {Ok} to restore settings. Press {Cancel} to close the window without restore settings.
Provides a way to verify the functional state of all of the keys, encoders, and faders on the console. Press/ move every key, encoder, and fader to verify that those events register on the diagnostic test screen.
Allows you to test peripherals such as fader wings.
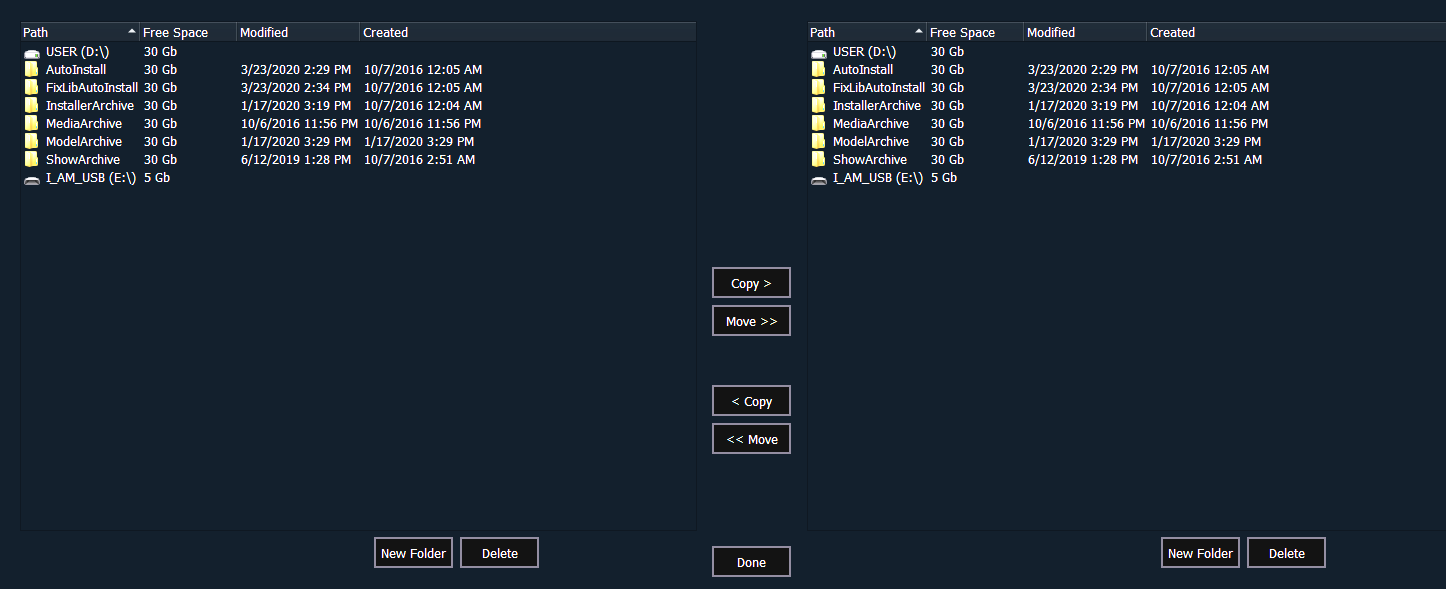
Provides a way to manage show files, show data, and software installers. You can create and delete new folders, move, and copy files between the console and USB drives.
The file manager display will show the ShowArchive folder on your console as well as any external USB drives that are detected. The display is split into two windows, so you can see two different folders at the same time for copying or moving data between them.
Note: Template show files are stored in a separate Templates folder rather than ShowArchive. See Template Show Files.
Note: This option is not available on Windows 10 devices.
Launches the GCE software. This softkey will only display if the software is installed on your console.
Launches the Concert software. This softkey will only display if the software is installed on your console.
Launches the UpdaterAtor software. This softkey will only display if the software is installed on your console.
Opens an application for testing your touchscreens.
This softkey is used for upgrading the console's outputs.

Upgrades the firmware for single-port Gadgets and consoles with I/O cards that have a phone remote connection. All other devices can use the Firmware Update window below.
When you first open the I/O Downloader, it will look for the connected console. This may take several seconds. Once the console is found, the downloader will search for the needed files. If it finds the file, it will list it and you can click {Download}. If it doesn't find the file, you can use {Browse} to look for the needed file and selected it. Once finished, click {Exit}.
Allows you to select an alternative show file storage location on another console or computer. After setting this location, it will appear as an option within the save and open dialogs in Eos.
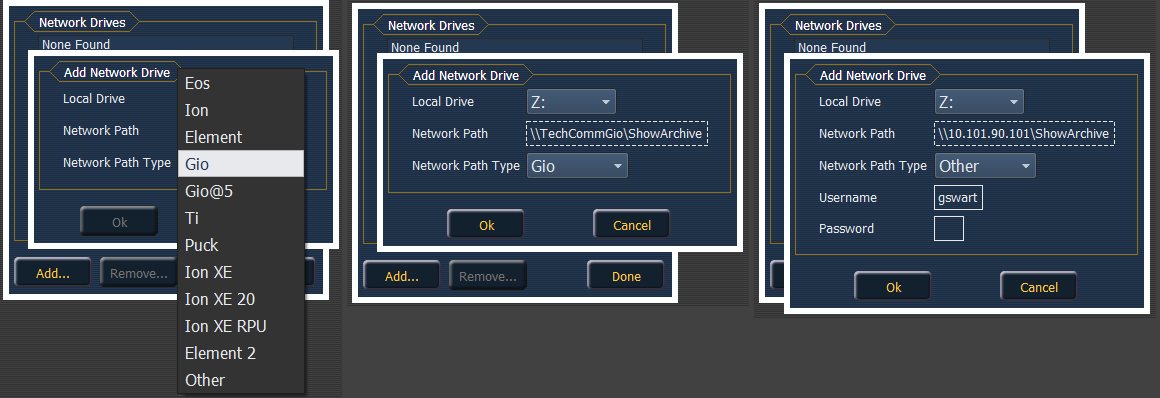
In the {Network Drives...} dialog box, there is a {Add} button for mapping a network drive. In the Add Network Drive dialog box, select the drive letter that is appropriate, the network path, and the path type. The network path can use either the IP Address or the Device Name. (Example: \\10.101.90.101\ShowArchive or \\YourDeviceName\ShowArchive) The network path type should match the device. If Other is selected, you will have additional fields to fill out for Username and Password.
Allows you to see if any folders are currently being shared by the console. You can select the folder and click {Don’t Share} if you no longer want to share the folder. By selecting {Don’t Share} here, you will also uncheck the box for sharing the show file archive on the General page of ECU Settings. See Share Show / Media / Model Archive
The firmware update window will display any detected devices that use firmware and may require an update. Devices that need to be updated will display in red.
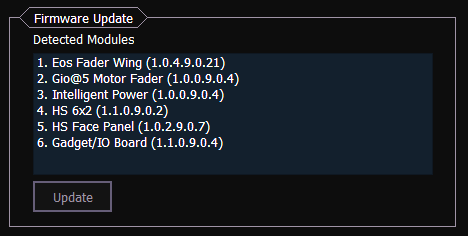
When a device is selected, the {Update} button will display in yellow if the device can be updated using this window. This includes devices that do not currently need to be updated. If the button is grayed out, the device can not be updated using this window.
Note: Windows 7 consoles must be power-cycled after a firmware update. This is not necessary for consoles running Windows 10.