Range Editing Parameters
You can enter the operational ranges for specific slots within any specific parameter (such as color scroller, color wheel, gobo wheel, and so on). You can do this by either defining each range individually or you can use the Quick Actions tools to define multiple ranges at once.
If a parameter has only one range, the values for that range will display in the range column. If that parameter has multiple ranges, the number of ranges will be displayed. If a range is used in a Modes, the range will not be in bold.
For example, if the parameter were “Gobo Wheel”, and the fixture included a four-slot gobo wheel, you can use ranges to determine the minimum/ maximum values for each of those slots. You can also label the slots and define the minimum/ maximum values that will appear in the channel display for that parameter.
To define the range values individually for any parameter:
- Use the [Page] keys to navigate to the parameter that you want to add ranges to.
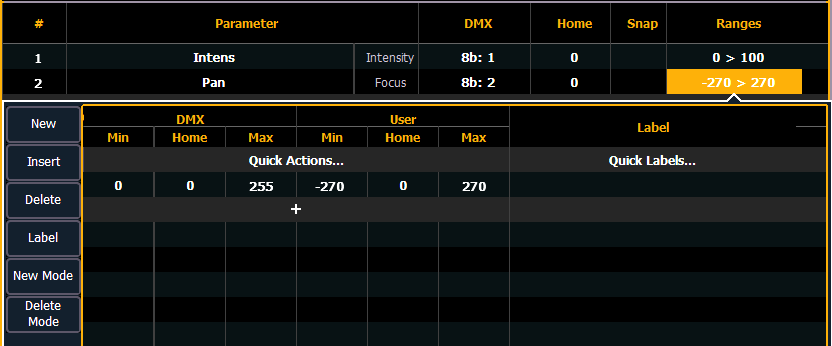
- Click on the range. The range window will open.
- Determine the total number of slots required by the parameter. Be sure to include “open” slots when needed.
- Press {New} or {+}to add ranges. Repeat this step until you have as many slots as are required by the number determined in step 3.
- Use the [Page] keys to select the range and field you wish to edit. Fields are:
- DMX Min - enter the minimum value (0-255 8bit / 0-65,535 16bit) for the range slot you are defining.
-
DMX Home - enter the default value (0-255 8bit / 0-65,535 16bit) for the range slot you are defining.
- DMX Max - enter the maximum value (0-255 8bit / 0-65,535 16bit) for the range slot.
- User Min- enter the value that will be displayed to users (for example, what will be displayed in the live summary view) when the slot is at its minimum value. Value can range from -32767 to 65535.
-
User Home- enter the value that will be displayed to users (for example, what will be displayed in the live summary view) when the slot is at its default value. Value can range from -32767 to 65535.
- User Max- enter the value that will be displayed to users when the slot is at its maximum value. Value can range from -32767 to 65535.
- Press {Label} to add a label to any range slots. These will appear in the encoder display (if available) and ML Controls when the related parameter is displayed for the new fixture.
- Press {Patch} when you have finished editing the ranges.
To delete a range value, select it and press {Delete}.
Quick Actions
Quick Actions provides tools that allow for the creation of multiple ranges at once according to predefined actions.
Note: Quick Actions supports 8bit and 16bit parameters.
Click on Quick Actions to open the menu. In this menu, you select the desired action and the number of slots needed.
The following actions are available:
- As-Is - this is the initial mode. The ranges are unchanged. This allows you to view the range as it was.
- User Values - these actions affect the user values.
- Framed - enter the number of frames that you would like to have on your collection of ranges. The console then distributes the DMX values and assigns a user range exactly as any of the wheel or frame parameters are automatically created. (Frames 1, 2, 3, etc would be represented as 0.5-1.4, 1.5-2.4, 2.5-3.4, etc)
- Matched - the user values are set to match the DMX values. This is required for a virtual parameter (one that has no DMX address) and is used as a Modes for another parameter.
- Scaled - users can enter the minimum and maximum user value to map their DMX ranges to an arbitrary user range. This is useful when creating pan/tilt ranges (e.g., -180 to 180), or color temperature ranges (e.g., 3000 to 15000). DMX ranges are not changed and are assumed to be as the user intends. The DMX values are scaled into the new user range.
- DMX Values - this action affects the DMX values.
- Distribute - select the number of ranges you wish to create. DMX values are then evenly distributed as specified.
Quick Labels
Click on Quick Labels to open a dropdown menu with labeling options. These options are broken down into two categories: units and labels.
- Labels
- Open
- Open/Color N
- Blackout
- Animation
- Animation N
- Color
- Color N
- Color M/N
- Color N/Open
- Effect
- Effect N
- Gobo
- Gobo N
- (clear)
Units are used to add a degree or percentage symbol to the end of a label when it displays in the encoder display or ML controls. If you want to remove a unit, select (none).
Labels are used to replace the text for all of the ranges. Labels that have an N after them will display the appropriate number in the encoder display or ML controls. For example, Gobo N will display the number of the gobo. Select (clear) to remove the labels.