This specifies the name the console will use to identify itself on the network to other devices. Examples might be Booth Desk or Tech Table.
The time is displayed in a 24-hour format as HH:MM:SS. Disabled by default.
The time the console is using. Time can be changed from the shell via Time Service (SNTP). Defaults to 12 hour format. To use 24 hour format, make sure 24 Hour Clock is enabled.
The time can also be changed manually within Eos via the Quick Access tools.
The date the console is using. This can be changed manually or via SNTP (Simple Network Time Protocol) time service. See Time Service (SNTP).
The date is displayed as DD / MM / YYYY.
The time zone the console is using. This is an offset from Greenwich Mean Time (GMT). Each setting in the pull-down list displays the offset, the name of the time zone and a couple of cities in that time zone.
Allows you to select the display language of Eos. Choices include English, Catalan, Bulgarian, German, Spanish, French, Italian, Slovak, Turkish, Japanese, Korean, Russian, Chinese - simplified, and Chinese - traditional.
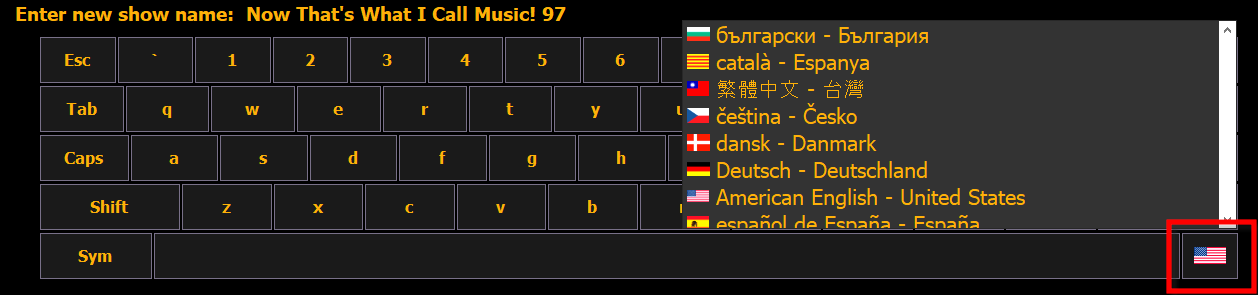
Allows you to select the language for the alphanumeric keyboard within Eos. A wide variety of keyboards are supported.
The keyboard can also be changed in the application when the virtual keyboard is open. Click on the flag icon to see a language drop-down menu.
Press {Sym} to switch the keyboard from alphanumeric to symbols. When in symbol mode, press {Abc} to return to the alphanumeric keyboard.
Allows the SHIFT key on an alphanumeric keyboard to be used as the console's [Shift] key. The Z key on an alphanumeric keyboard will function as the [Shift] key.
When enabled, the console will boot into the welcome screen every time instead of booting directly into the main application. When disabled, the console will boot into the mode in which it was last used in (i.e. Backup, Client, Primary).
Note: This option is not available on ETCnomad.
When this is checked, the console will receive software updates from the primary if used in a multi-console system.
Note: This option is not available on Windows 10 devices or ETCnomad.
When checked, this box allows primary consoles running software v3.0 and later to update backup and client consoles running v2.x software.
Note: This option is only available on ETCnomad.
When enabled, ETCnomad will automatically launch fullscreen, on all connected monitors of your computer. Select "1" in the "Windows Per Fullscreen Display" dropdown to show a single fullscreen ETCnomad display on each monitor, or "2" to subdivide each fullscreen display into 2 ETCnomad windows.
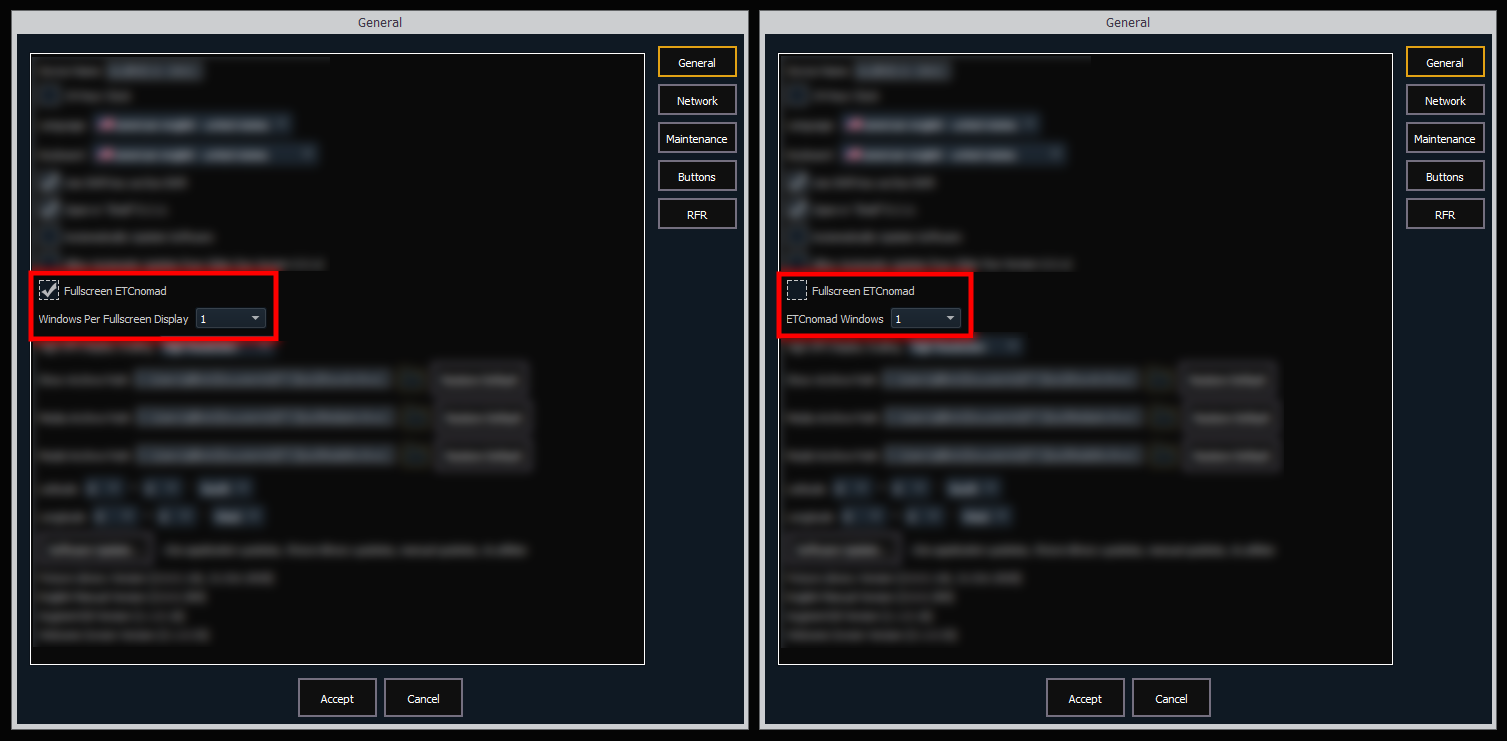
When disabled, ETCnomad will launch in a standard windowed display. The "ETCnomad Windows" dropdown allows you to choose to open up to 6 separate windows.
The default location to save show files, media files, or Augment3d models. The full path must be typed in and specified in a legal Windows format.
If you decide to change this setting, it is recommended that you keep this location on the D: drive. The {Restore Default} buttons will return a changed location to the ETC default.
Enables you to share the show, media, or Augment3d model archive folders on the console with another console via Windows File Sharing (SMB).
When a show file is assigned as a template, Eos will create a copy of the file in the Templates folder to be used as the default starting point for any new show files. A new option will appear in the CIA under File > New From Template (Template Show File Name) to create a new show file identical to the template. A blank show file can always be created with the File > New option.
Templates can be managed via the File Manager, and are unaffected by deep clears. See Settings > Maintenance.
Allows you to select the latitude the console is using.
Allows you to select the longitude the console is using.
Note: Before you calibrate your external touchscreens, you may need to first use the External Monitor Arrangement display. See {Monitor Arrangement...}
Allows you to calibrate an Elo touchscreen. With the touchscreen connected, press the {Calibrate Elo External Touchscreen}.
The first display will have you touch some targets, and the second will have you touch various parts of the display to make sure the cursor follows your finger. If that works fine, press the green checkbox. If you need to return to the previous display, press the blue arrow button.
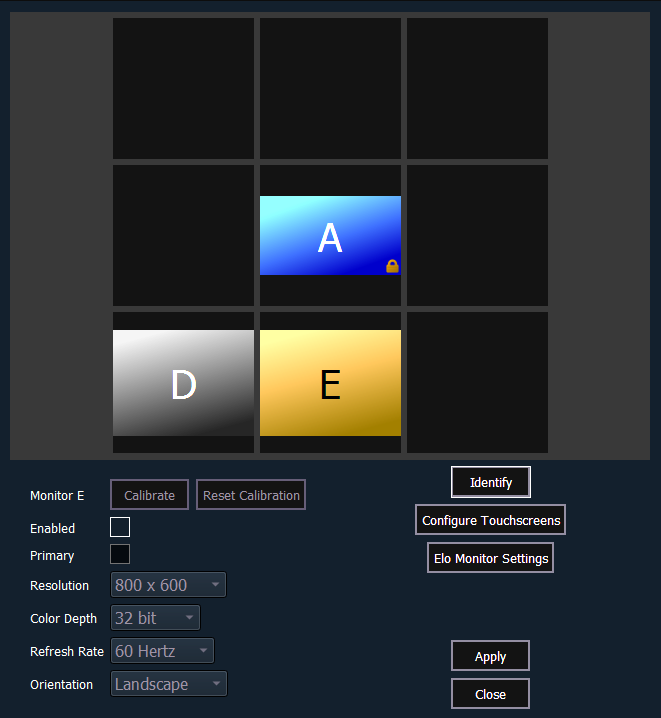
Note: The selected monitor will display in yellow. External monitors can be dragged to any of the surrounding black boxes to mimic actual monitor layout. Internal monitors are locked in relationship to each other and cannot be changed.
The monitor arrangement tool will dictate how and where the pointer moves from one monitor to another. Generally speaking, you will want the logical placement on this screen to match your physical placement.
Buttons available in the monitor arrangement display are:
Note: Only supported options will display. Monitor options may vary. While it is possible to assign a resolution lower than the minimum (1920x1080), it is recommended to be at 1920x1080 or higher.
Note: Built-in monitor settings are read-only.
Allows the installation of Eos Family software and other ETC-approved software (Concert, UpdaterAtor, GCE, and NCE). Updating Eos Family software does not affect or update the software in any other networked device such as a Net3 Gateway.
When you click on {Software Update...}, the console looks at the root directory of any connected USB storage device for an Eos Family console software update file. You will be shown the names of any updater files found on the drive. Select the file you would like to install and click the {Install} button, or click {Cancel}. The software will first save to the hard drive before opening the installer.
You will also receive a message if no software update file can be found.
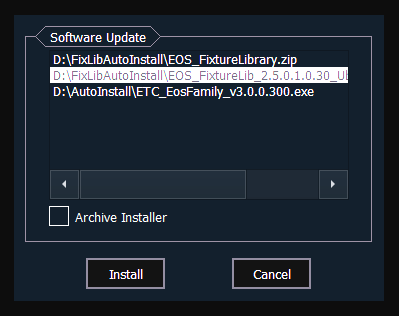
Shows the available Eos software version installers currently saved on the console's local hard drive. You can save multiple software versions onto your console's hard drive in case you wish to downgrade.
While installing the software, you can archive the installer used. Check the Archive Installer box for the selected version, and it will archive while installing the software. If you would like to archive installers without installing their software, you can do that by using the File Manager utility in ECU > Settings > Maintenance.
You can also retrieve these versions from the archive to save them to a USB drive by using the File Manager.
Note: On new consoles, some versions are preselected to be archived when initially shipped from ETC. This includes the version of software that is currently installed from the factory as well as any patches to that version (if available). For future releases, you will need to download the Eos Family software from the ETC website, etcconnect.com.
{Software Update...} also recognizes zipped fixture library files provided by ETC.
Note: This option is not available on Windows 10 devices.
Eos v3.0.0 introduced the ability to switch between v2.9.x and v3.0.0 and later on consoles capable of running both. If v2.9.x is already installed, installing v3.0.0 or later automatically retains the 2.9.x version of software.
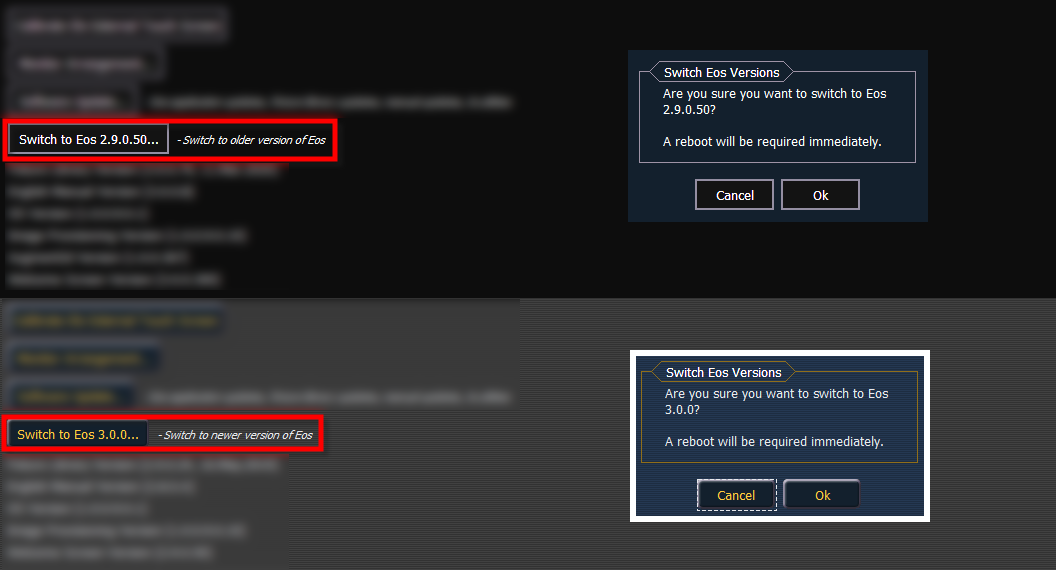
Use the softkey to alternate between versions. A restart will be required before any changes can take effect.
Note: If a console is updated to v3.0.0 or later from a version prior to v2.9.X, you will be able to revert from v3.0.0 or later to the prior version. However, you will be unable to return to v3.0.0 or later without first updating to v2.9.X.
Key information about installed software and other components. {Extended Version Info...} will open a window with additional details.