Vectorworks Augment3d Plug-in
Eos 3.2.0 and newer utilize Vectorworks' MVR export to move model and fixture data, and require Vectorworks 2023 Service Pack 3 or later. Older versions of Eos use generic 3D exports from Vectorworks for models, and an ETC-made plug-in for fixture data.
Legacy installation instructions for the plug-in are available below.
Vectorworks System Requirements
Please reference vectorworks.net/sysreq.
Installing the Vectorworks Augment3d Plug-in
- Download the appropriate plug-in for your operating system (Windows or macOS) from etcconnect.com, and extract it. The folder will contain a copy of these instructions and the Vectorworks Augment3d Plug-in as a .vwlibrary file.
- Open Vectorworks and navigate to Tools > Plug-ins > Plug-in Manager > Third-party Plug-ins.
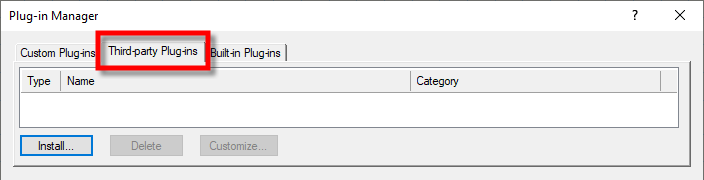
- Select {Install} and choose the .vwlibrary plug-in file you extracted in Step 1.
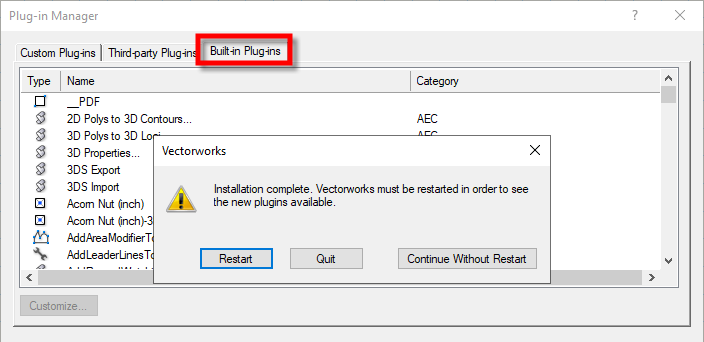
- Restart Vectorworks when prompted. After relaunch, the installed plug-in will appear in the Built-in Plug-ins tab.
Configuring Vectorworks to use the Augment3d Plug-in
- Launch Vectorworks.
- Configure your Vectorworks workspace.
- Open the Workspace Editor. Navigate to Tools > Workspaces > Edit Current Workspace.
- Expand the ETC node in the Commands panel:

- Drag "Export to ETC Augment3d" to the Spotlight node.
- Select {OK} to close the Workspace Editor.
- In Vectorworks 2019, you must map the information you want to export to Augment3d. (Vectorworks 2020 and later do not have this option; skip to step 4.) If exporting for the first time, or to change export preferences, navigate to File > Document Settings > Spotlight Preferences.
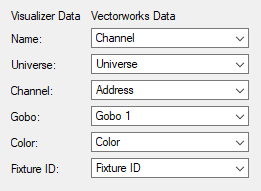
- Select Edit Visualizer Data Mapping. Recommended mapping below:
- Select {OK} to close the Data Mapping window.
- Navigate to Spotlight > Export to ETC Augment3d and follow the prompt.
Vectorworks will export an a3d file containing your information for import into Augment3d.
CAUTION: Layers containing lights must be visible in the Vectorworks file in order to export to Augment3d. If no lights are visible, a pop-up will notify you that the file is empty, and cannot be exported.
Importing to Augment3d
Vectorworks Augment3d files can be imported into Augment3d Using the Browser via File > Import > Augment3d (From Vectorworks).
When importing, you will likely need to adjust the data before proceeding.
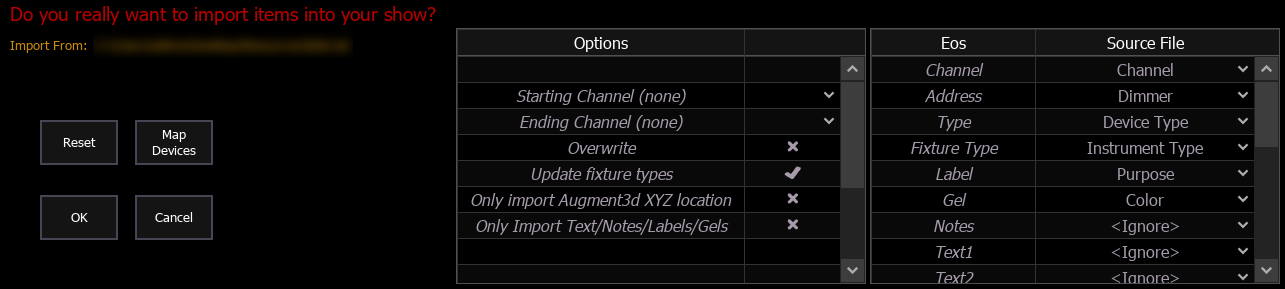
Options
The following options are available:
- Starting / Ending Channel - defines a specific range of channels to be imported.
- Overwrite - overwrites the data in the show file when enabled, and merges the data when disabled. Disabled by default.
- Update fixture types - enables or disables the update of fixture types in the show file. Enabled by default.
- Only import Augment3d XYZ location - enables import of just Augment3d location data. Disabled by default.
- Only Import Text/Notes/Labels/Gels - enables import of just the patch database text. Disabled by default.
Mapping Fields
You can map Eos patch fields to fields in the source file being imported. Channel and Address are required; any other field can be ignored if desired. Options can be selected again for placement in multiple fields.
Address Formats
Eos will accept multiple address formats for importing. Examples of those formats are 2/3, 2.3, 2,3, 2-3. Eos will convert all formats to n/n.
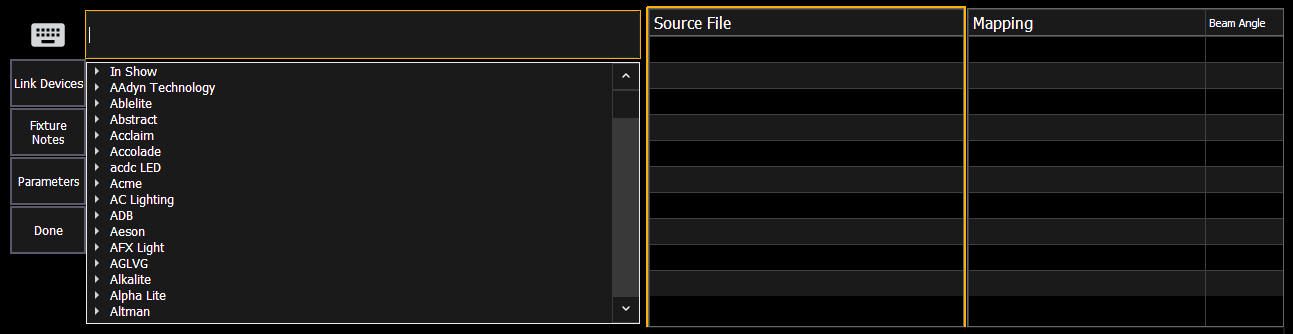
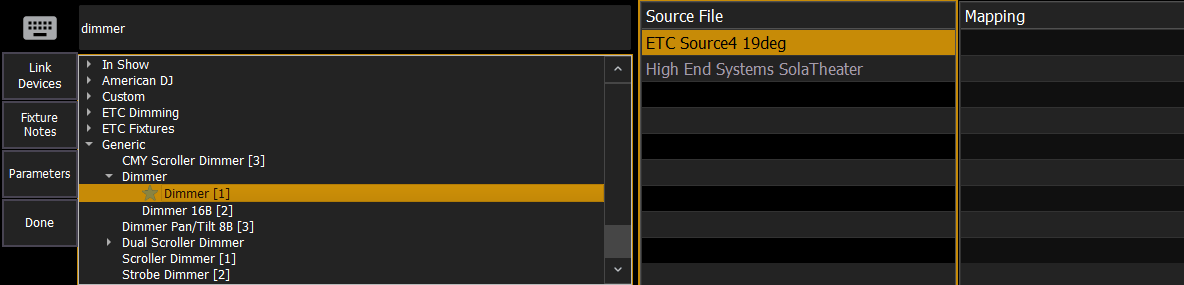
{Map Devices}
You can also map Eos fixture library devices to devices in the source file.
-
Select {Map Devices} to open the mapping utility.
- Select a device from the Source File column and choose its matching Eos fixture profile.
Multiple devices can be selected at a time.
- Select {Link Devices}.
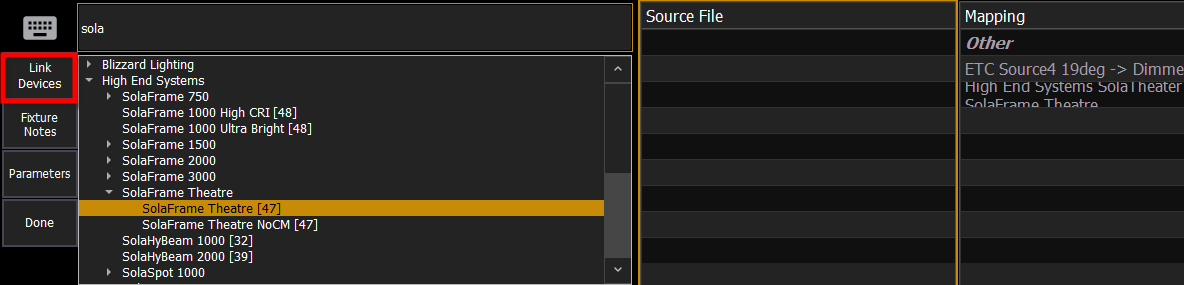
- Repeat steps 2 and 3 until all devices have been associated with fixture profiles. To unlink a device, select it in the Mapping column and select {Unlink Device}.
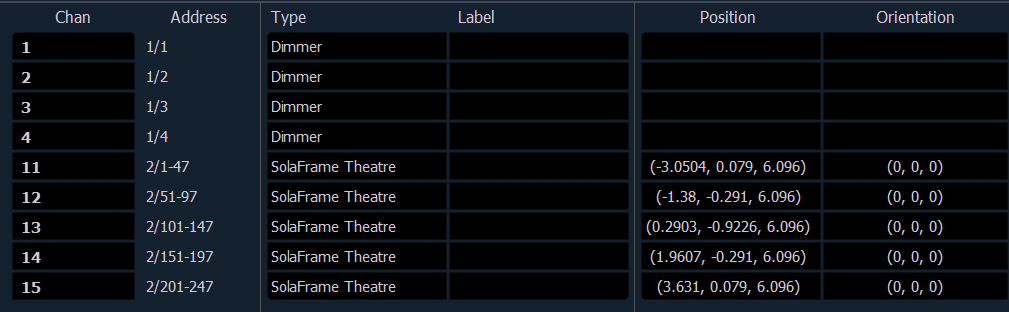
- When complete, select {Done}, then {OK}. Your devices and their associated position information will now appear in Patch and Augment3d.
Device mapping and import fields are saved with the show file.
Exporting Scenery
The Vectorworks Augment3d Plug-in only supports the export of fixtures.
Follow the steps below if you have scenery in your Vectorworks file that you would also like to export.
- Hide all fixtures in the Vectorworks workspace.
- Expose only the scenery you wish to export, then export as a Collada file by navigating to File > Export > Export COLLADA (3D Only).
- In Augment3d, import the Collada file. For more information on importing Augment3d objects, refer to the Eos Family Operations Manual chapter on Augment3d.