
Once fixtures are selected within an editor, you can modify their parameters.
Hog consoles provide several ways to adjust the different parameter types:
If the fixture has more parameters of a particular type than there are parameter wheels you can press the parameter type keys to page through the parameters.
The Slot Toolbar also has buttons to access the control functions: Enable, Mode and Control.
Fixture intensities can either be assigned from the keypad or using the I-Wheel, as well as the parameter wheels and by editing directly in the editor spreadsheet.
To assign intensities using the @ key and the numeric keypad:
To assign fixtures to full or zero:
The intensity of a fixture can be changed relative to its current level, for example:
The intensity of a fixture can be scaled proportionally, for example:
On the Hog 4 Console and on Hog 4 PC only: Moving the I-Wheel changes the level of the selected fixtures. When selecting several fixtures and adjusting levels, the wheel will maintain relative differences between them, so that all intensities change by the same amount. For example, if fixture 1 is at 10%, 2 at 50% and the wheel is increased by 10%, then fixture 1 will move to 20% and 2 will move to 60%.
By holding the Pig key whilst using the wheel, intensities will be increased or decreased in proportion to their individual level. For example, if fixture 1 is at 10%, 2 at 50% and the wheel is increased by 10%, then fixture 1 will move to 11% and 2 will move to 55%.
On the Hog 4 Console and Hog 4 PC only: The Nudge Up and Nudge Down keys can be used to increase and decrease the intensity by a preset amount. The size of the increment is 10% by default, but you can change it in the Programming pane of the User Preferences window.
Using Pig + Nudge Up and Pig + Nudge Down will create a half nudge step. It will increase or decrease the intensity by half of the assigned amount. For instance if the nudge value is set to +10% a Pig + Nudge Up will produce +5%.
The Rem Dim button on the Main Toolbar sets the intensity of any unselected fixtures in the current editor to 0%. The Rem Dim button is disabled by default in new shows. To enable the Rem Dim button open the preferences window and turn off the "Disable Rem Dim Button" located under the programming tab.
Multiple options exist for modifying the position parameters.
To switch the Trackball from controlling the cursor to controlling fixture position, press the top right selection key adjacent to the Trackball. When controlling fixture position the Trackball will glow blue, and can be used in two modes. To change mode press the top right Trackball selection key.
The Status Bar at the right hand end of the Command Line Toolbar shows when the Trackball is in Position Mode with the legend 'POS', and when it is in Ortho Mode with the legend 'Ortho'.
You can assign the way that fixtures move in relation to the Trackball. See Swap Axes.
Tip: An external mouse will always control the graphical pointer, so you can keep the Trackball in position mode to save having to change modes as you program.
The pan and tilt parameters also appear on the parameter wheels after the Position key is depressed, and can be used as an alternative to the Trackball.
With some moving lights, there is more than one combination of pan and tilt that results in the beam hitting the same point on the stage. You may sometimes want to change the pan and tilt combination being used, for example to ensure that the fixture takes the most direct route during a position change.
The Flip function cycles the selected fixtures through the possible combinations in turn. To do this, select the fixture or fixtures and press Flip on the Main Toolbar.
Holding the Pig key down while pressing Flip cycles through the combinations the other way.
Tip: When the Trackball is in position mode, the top left Trackball key also acts as a Flip key, for quick access while positioning fixtures.
Colour and beam parameters can be either discrete (known as ‘slotted’) or continuous. An example of a slotted parameter is the gobo and colour wheels in a moving light, which can be assigned to values such as Gobo 1 and Colour 3. Examples of continuous parameters are the colour mixing controls on some moving lights, irises, and variable-speed strobes; these can be assigned to a percentage or real-world value. It is sometimes useful to treat slotted parameters as continuous; for example, you might want to assign a gobo or colour wheel part way between two positions to achieve a particular effect. Hog 4 OS allows you to treat such parameters as either slotted or continuous when assigning values to them.
To control continuous colour and beam parameters:
The Wheels Toolbar for the Beam Parameters of a Studio Spot 575
The Wheelsets Toolbar for a Studio Spot 575
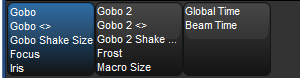
Some parameters that appear on the parameter wheels have more than one mode. These modes are shown as a list on the Wheels Toolbar, and you can select the modes by clicking on the wheel's button on the toolbar.
For parameters appearing on the parameter wheels, you can hold Set, then press the associated button on the Wheels Toolbar to open a direct value entry dialog.
The Wheels Toolbar Direct Entry Dialog

Enter a value for the parameter in the direct value entry box and select any available modes. Press Enter to complete the direct value entry.
When you have several fixtures selected, you can make all the values of a parameter the same as that of the first fixture:
You can assign a parameter to its endstop values:
Some parameters have values either side of zero; for example, gobo rotation speed. You can invert such parameters so that they have the same value but the other side of zero. In the case of gobo rotation, this reverses the direction whilst maintaining the current speed. To invert a parameter:
To control slotted colour and beam parameters such as gobo and colour wheels:
The Slot Toolbar for a Studio Spot 575

The Colour Slots Toolbar for a Studio Spot 575, for Colour wheel 1.

Fixtures with variable color mixing capabilities can be controlled using variety of tools in Hog 4 OS including the Color Picker window, encoder wheels, and directly in editor spreadsheets. Please refer to Section 2.6 for more information on the various color mixing systems used in lighting applications and how Hog 4 OS models these parameters.
Editing the color mixing parameters of a fixture is fundamentally the same as editing other parameters in Hog 4 OS with the following exceptions:
Color mixing functions in Hog 4 OS cannot be separated. Whenever a physical or virtual color mixing function is ‘touched’ in an editor, all the other color mixing functions will also be ‘touched' even if the “separate parameters” option is turned off for the Colour Kind. This is also true for knockout. If a color mixing function is knocked out, then all color mixing functions are knocked out.
The Colour Picker window features a variety of different graphical color mixing controls that dynamically change based on the current fixture selection.
The Colour Picker Window can be opened using the following methods:
Hold down the Open key and select Colour Picker
Pig + Open + Colour
Press the Colour Picker button at the top of the Colour Directory window.
Press and hold on the touch screen in an empty area to bring up a menu window and press Colour Picker button in the menu window.
The Colour Picker window has four tabs (Virtual, Physical, Tint, and Gel) which allow the operator to quickly access different sets of color mixing tools.
The virtual tab contains a variety of sliders and graphical controls across different color spaces that allow operators to mix a desired color which Hog 4 OS uses to generate a physical color function values for each fixture in the current selection based on each fixture's unique color mixing capabilities.

Color Space Graphic Control
A graphical representation of the selected color space (see color space selector menu). When color mixing fixtures are selected a white outline will appear that represents the color gamut of the first fixture type in the current selection. A solid gamut line indicates the fixture type is calibrated whereas a dotted gamut line indicates the fixture type is not calibrated. White crosshairs indicate the currently selected color.
Preview cell
Shows a preview of the expected color mixing system output of the first fixture in the current selection.
Brightest / Hybrid
This option determines which physical metamer mix will be used to create the chosen virtual color. The brightest option results in metamer mixes that prioritize perceived brightness over color accuracy. The hybrid option prioritizes color accuracy while still trying to maintain brightness.
Gel Overlay Menu
Shows different gel swatch books on the picker graphical control. Console will not snap to gels unless click or tapped on in the UI.
Tapping or clicking on the color space menu switches the graphical control, sliders, and direct entry boxes to the next color space in the list.
Function Sliders and Direct Entry Boxes
The sliders control the various virtual color mixing parameters by click or touch and drag whereas the direct entry boxes allow for discrete entry of a specific value. Interactions with these controls include:
Single Click or Tap anywhere on slider = nudge positive or negative
Double Click or Tap anywhere on slider = jump to value
Click / Press and drag on slider = jump and move with cursor
Status tray
The status tray shown below the graphical color mixing controls indicates which (if any) physical color mixing functions are locked. When physical color mixing functions are locked the effective gamut of one or more fixtures in the current selection is reduced. To manually lock and unlock physical color mixing functions use the lock buttons located in the physical tab of the Colour Picker.
The Physical tab of the Colour Picker window displays the physical color mixing functions for all fixtures in the current fixture selection. The physical tab does NOT display supplemental color mixing functions such as CCT, CTO, or CTB as these functions only appear on the encoder wheels and in editor spreadsheets.
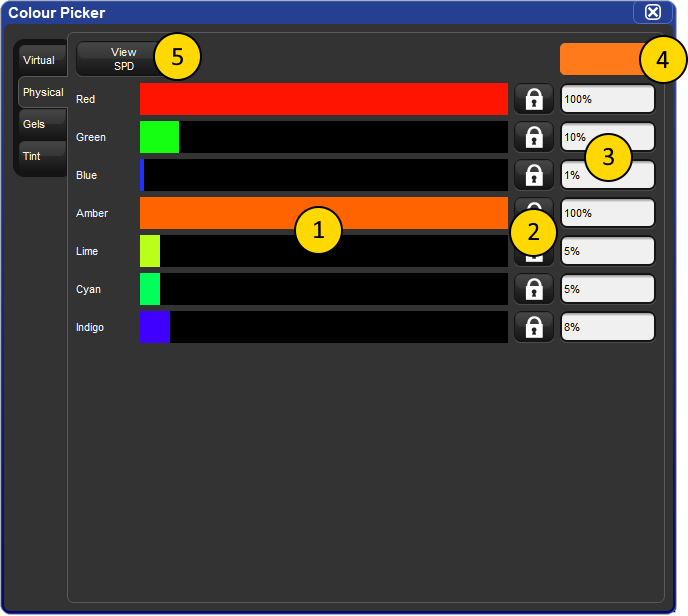
Physical Function Sliders
Graphical UI elements that adjust parameter values of the represented physical function.
Function Lock
Locking a physical color mixing parameter prevents that parameter from being modified when using the virtual color mixing tools, adjusting tint, or applying gels.
Direct Entry Boxes
Displays the current value of the physical function and allows for direct entry of the desired level.
Preview cell
Shows a preview of the expected color mixing system output of the first fixture in the current selection.
SPD Toggle
Toggles the physical tab into a Spectral Power Diagram view.
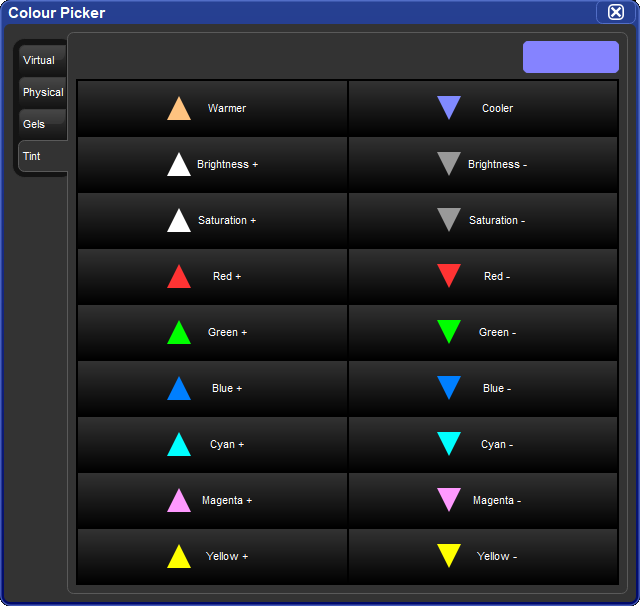
The tint tab contains a series of buttons that apply relative adjustments to the color mix of the current fixture selection. Press and release any button to apply a small adjustment. Press and hold any button to apply a continuous adjustment.
The Gels tab can be used to apply variety of industry standard gels to the current fixture selection.
To use the gels tab:
Select one of the gel books in the vertical left-hand menu. Gels from the selected book are presented in color coded cells along with a number and name. Gel names and colors cannot be edited by the operator.
Select a gel from the gel book to apply it to all color mixing capable fixtures in the current selection.
It is important to note that selecting a Gel only copies color mixing values to the selected fixtures. No reference to the gel is created in programming.
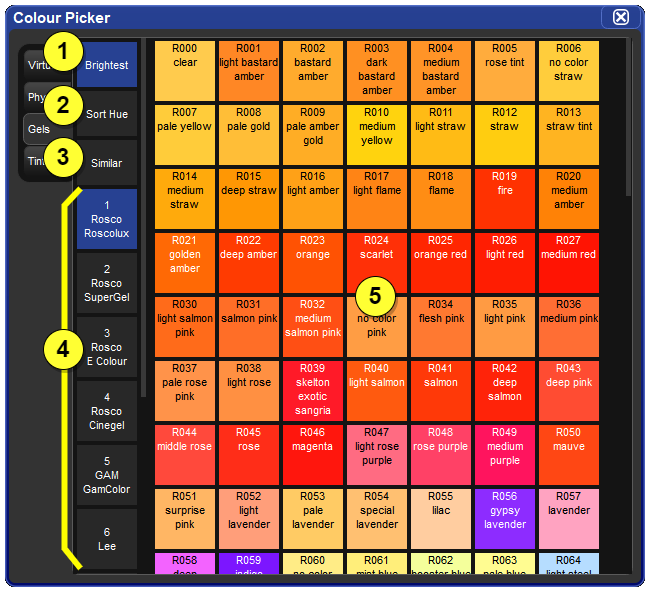
Brightest / Hybrid - determines which metamer mix the console will use to achieve the selected gel color. The "Brightest" option yields the most luminous result whereas "Hybrid" sacrifices some brightness to achieve a more accurate color result.
Sort Hue - when enabled, the gels in the selected gel book will be displayed in hue order. When this option is not selected the gels in the selected gel book will be displayed in gel number order.
Similar- reduces the number of gels displayed in the selected gel book to only those that are visually similar to the currently mixed color of the first fixture in the current fixture selection.
Gel Books - gels are collected into different gel books which can be selected using the Gel Book buttons which are displayed along the left-hand side of the gels tab.
Gels Grid - the gel area shows all of the stored gels for the currently selected gel book. The gel area can be scrolled using cursor keys and/or two finger touchscreen gesture.
Holding the Pig key and moving the encoder wheel allows fine adjustment of the currently selected parameter, so that each turn of the wheel will change the parameter value by a smaller amount. This is useful for making exact adjustments to values.
When you start to record your programming as cues you will find that only the parameters that you have assigned values to are stored; these are known as ‘Hard Values’. This is important because in cuelists values track through until they are changed, and this allows different playbacks to interact to create a single onstage look. For a complete explanation of tracking, see Tracking.
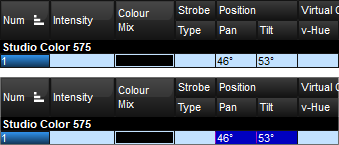
However you will sometimes want to ensure that a value is stored at its current value in a cue or palette. To do this you can Touch it:
Untouched values appear in the editor with a white background. Once you have touched parameter values they are available for recording in the same way as any value that you have assigned. They are shown with a blue background, indicating that they have been modified:
Parameters before and after Touching
You can bring parameter values into an editor without touching them using Pig + Touch. As the parameters haven't been touched, they won't be recorded as part of the contents of the editor. This can be useful if you want to have the parameter values in the editor in order to copy them to other fixtures.
For example, to copy parameter values from fixtures 1-5 that are on stage to fixtures 6-10 in the current editor:
1 Thru 5 Pig + Touch : select the fixtures 1-5, and bring their onstage values into the editor without touching them:

Copy 6 Thru 10, Enter : copy the parameter values to fixtures 6-10:
If the above example had used Touch instead of Pig + Touch, then you would have to untouch or knockout 1-5 before recording.
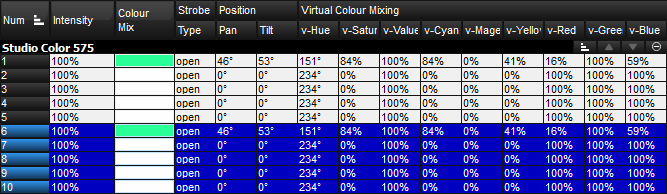
Tip: Values with a dark or light blue background in the Programmer or editor are recordable, while those with a white or gray background are not recordable.
You can copy the parameter values of one fixture to another.
Important: If you copy parameter settings between fixtures of different types, only those parameters that the fixtures have in common will be copied.
To copy from the current selection:
To copy from specified fixtures:
To copy parameter values from the fixtures of one group to the fixtures of another group within an editor:
You can add parameter, location and destination masks to any copy command:
You can use Copy to reverse the order of values. For example, if fixture 1 is at 10%, fixture 2 at 20%, and fixture 3 is at 30%:
Tip: When you press the Copy key, the words ‘Copy to’ appear on the command line. This is a useful reminder of the syntax of the copy command.
You can copy fixture data by using the Copy and Paste commands: click the right-hand mouse or Trackball button on the desired cell(s) in the editor window and select Copy or Paste from the menu.
You can also use the Pig key to copy and paste selected cells:
By default, when you copy parameter values from one fixture to another, the console will copy exactly the data from one fixture to another, including any palette references. You can optionally have the hard values from within the referenced palette copied to the destination instead of the palette references:
Tip: You can copy a fixture to itself with Allow Refs deselected to convert palette references to hard values.
You can reset parameter values to their default settings by using the . (point) key or Pig + . keys as a modifier. Default values for parameters can be set in the Edit Fixtures window.
When using the . key as a modifier, modes such as gobo rotate will be restored to default value but the current mode will remain (gobo rotate). When using the Pig + . keys as a modifier, modes such as gobo rotate will be restored to default value and default mode (index).
To restore the default value for a single parameter of the current selection:
To restore the default values of a parameter kind for the current selection:
To restore the default values for all parameters of the current selection: