


You can assign fade time and delay times, as well as paths, to cues and scenes. Cues recorded without assigning any time information will be given the default time; this can be adjusted in the Default Timing pane of the User Preferences window.
To record a cue with a fade time other than the default:
To assign times greater than 1 minute, enter the number of minutes followed by the number of seconds:
To change the time of an already recorded cue:
You can assign different fade-in and fade-out times (known as a ‘split time’) using the / key. For example:
Important: Hog 4 OS's definition of fade-in and fade-out times is different to that used by some other consoles. Some consoles use fade-in and fade-out times for intensity parameters only and have a separate time for all other parameters; Hog 4 OS has fade-in and fade-out times for each individual parameter. Also, with some consoles the fade-out time applies when the cue goes out, so that cue 2's fade-out time takes effect during the change from cue 2 to cue 3 rather than (as with Hog 4 OS) cue 1 to cue 2.
You can record fade times with a mask. For example:
Tip: If you want to assign individual times for several fixtures or fixture parameters, you can edit them in the Cue Editor window by clicking on its Fade button; see Individual Parameter Timings.
You can create a delay between the cue being triggered and the fade times beginning to execute by assigning the Delay time:
Alternatively, you can use the command line, pressing the Time key twice to assign the delay time:
Cue 2 Time Time 5 Enter
Tip: Note that the Delay time should not be confused with the Wait time; see Cue Wait Timing.
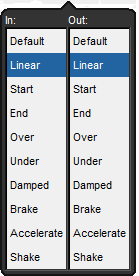
Paths determine the way parameter values change during a cue. For example, with the simplest (linear) path, an intensity parameter travels from its start value to its end value at a steady rate of change for the duration of the cue. The paths available are shown below.
| Path | Description | |
|---|---|---|
| Default | Uses the default path from the fixture's library definition. This is generally Linear for continuous parameters and Start for slotted parameters. | |
| Linear |
|
Fades at a steady rate for the duration of the cue. |
| Start |
|
Snap change at the beginning of the cue. |
| End |
|
Snap change at the end of the cue. |
| Over |
|
The parameters overshoot their destination and then return to it. |
| Under |
|
The parameters move first in the opposite direction before going to their destination. |
| Damped |
|
The parameters change more slowly at the start and end of the cue than in the middle. |
| Brake |
|
The parameters change more slowly at the end of the cue. |
| Accelerate |
|
The parameters change more slowly at the start of the cue. |
| Shake |
|
The parameters follow a chaotic, sawtooth fade over the course of the cue. |
To select a path for a cue:
Tip: The shape of the paths described above applies when the cue is asserted. When it is released, the path is effectively reversed. For example, attributes with a ‘Start’ path will snap on the Go of a cue, but will snap at the very end of that cue being released (behaving like an ‘End’ path).
You can edit fade or delay times in the Cuelist window. Assigning fade or delay times here will assign the new value to all the parameters of all the fixtures in the cue.
When entering a time value, it should be in the form:
[hours] h [minutes] m [seconds] s / [hours] h [minutes] m [seconds] s
For example:
Use the H, M and S buttons that appear when editing a fade or delay time cell to enter the H, M and S text into the cell. Alternatively, you can use an external keyboard.
Note that if you enter 140 the time will be 1 minute 40 seconds, not 140 seconds (2 minutes 20 seconds).
To assign paths directly in the Cuelist window:
The In path is applied when a fixture is increasing in intensity during the cross-fade, and the Out path when a fixture is decreasing in intensity.
Press OK.
The different types of paths are explained in Paths.