13.3 Individual Parameter Timing

When you record a cue, all of the fixture parameters in the cue are assigned the default fade, delay, and path values. Similarly, when you assign timings to a cue after recording, the timing value is applied to all fixture parameters in the cue. However, you can assign fade, delay, or path values to individual parameters in the Programmer, and these settings are then included when you record cues and scenes, and (optionally) palettes. You can also assign timings to parameters in the cue, scene and palette editors. Note that you can only assign timings for a parameter that has a value in the editor.

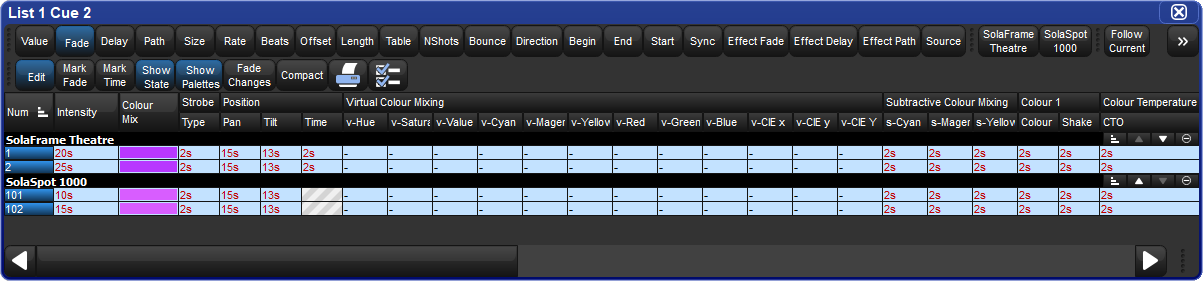
To display parameter fade times, delay times, or paths in an editor, select the Fade, Delay, or Path buttons from the top left of the editor window.

You can assign the individual timings of parameters using the parameter wheels, the command line or directly in editor windows. You can also assign timings to all parameters of a fixture using the parameter wheels or the command line.

Important: If you assign individual timings for parameters and subsequently assign an overall cue time, then the individual parameter timings will be replaced by the overall cue time


13.3.1 Assign Parameter Timings using Wheels

To assign fade and delay timings to all the parameters of a fixture:

  1. Select the fixtures that you want to assign timings to, making sure that they have been given parameter values.
  2. Press the Time key.
  3. The Wheels Toolbar will show the available timing types (Fade In, Fade Out, Delay In, and Delay Out) together with their current settings.
  4. Use the parameter wheels to assign the desired Fade In, Fade Out, Delay In, and Delay Out.

Note that if you want to see the timings that you have assigned in the editor, you can select the Fade or Delay views using the buttons in the top left of the editor window. You don't have to be in these views to assign timings, however.

Wheels Toolbar Timing

To assign fade and delay timings to specific parameter types:

  1. Select the fixtures that you want to assign timings to, making sure that they have been given parameter values.
  2. Press the Time key.
  3. The Wheels Toolbar will show the available timing types.
  4. Click on Fade In, Fade Out, Delay In, or Delay Out and select a parameter type.
  5. Use the parameter wheels to assign the desired timing.

Wheels Toolbar Timing Param Types

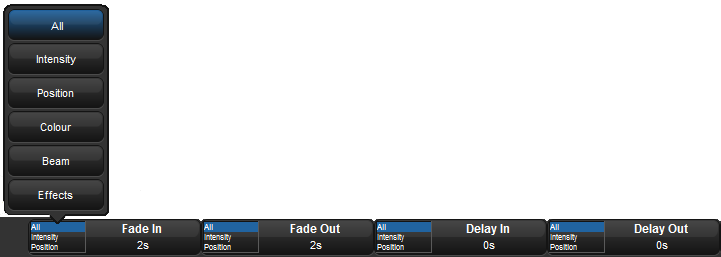
To assign a path to all the parameters of a fixture:

  1. Select the fixtures that you want to assign a path to, making sure that they have been given parameter values.
  2. Press the Time key.
  3. The Slot Toolbar will show buttons for All, In and Out

Slot Toolbar Path

  1. Choose In to assign a path to be applied to the parameters when the fixture they belong to is increasing in intensity during the cross-fade. Choose Out to assign a path to be applied to parameters when the fixture they belong to is decreasing in intensity during the cross-fade. Choose All to assign a path to be applied to parameters of fixtures irrespective of whether their intensity is increasing or decreasing.
  2. The Paths Toolbar will open , as shown below.

Paths Toolbar

  1. Select the desired path from the Paths Toolbar. The different types of path are explained in Paths.

13.3.2 Assign Parameter Timings with the Command Line

To assign the fade time for all parameters of a fixture:

  1. Fixture 1 : select the fixtures you want to assign a time to, making sure that they have been given parameter values.
  2. Time 4, Enter : assigns the fade time to 4 seconds.

To assign separate fade in and fade out times:

  1. Fixture 1 : select the fixtures you want to assign a time to, making sure that they have been given parameter values.
  2. Time 4 / 7, Enter : assigns the Fade In time to 4 seconds and the Fade Out time to 7 seconds.

To assign a fade time for a particular parameter type:

  1. Fixture 1 : select the desired fixtures.
  2. Colour Time 4, Enter : assigns the fade time of the colour parameters to 4 seconds.

To assign a delay time, press the Time key twice:

  1. Fixture 1 : select the desired fixtures.
  2. Time Time 2, Enter : pressing Time twice assigns the delay time.

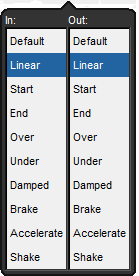
To assign a path, press the Time key three times:

  1. Fixture 1 : select the desired fixtures.
  2. Time Time Time 2, Enter : enter a number to represent the path.

Select the path by entering a number; the mapping is the same as the order they appear on the path toolbar, starting at zero for the default path.

13.3.3 Assign Parameter Timings in an Editor

To assign fade or delay times directly in the spreadsheet of an editor:

  1. View the required timing type by pressing either the Fade or Delay button in the top left of the editor window.
  2. Click in the cell for the desired parameter, or click and drag to select a range of cells.
  3. Press Set.
  4. Type in a time value, and press Enter.

Cue Editor Times

When entering a time value, it should be in the form:

[hours] h [minutes] m [seconds] s / [hours] h [minutes] m [seconds] s

For example:

2s : 2 seconds in and out times.

2s/5s : 2 seconds in, 5 seconds out.

1m : 1 minute in and out times.

1m10s : 1 minute and 10 seconds in and out times.

1h10m30s/1h : 1 hour, 10 minutes and 30 seconds in time, and 1 hour out time.

Use the H, M and S buttons that appear when editing a fade or delay time cell to enter the H, M and S text into the cell. Alternatively, you can use an external keyboard.

Tip: If you enter 120, this will be interpreted as 1 minute 20 seconds. To have the console interpret it as 120 seconds (i.e. 2 minutes), enter 120s.

To assign paths directly in the spreadsheet of an editor:

  1. Press the Path button in the top left of the editor window.
  2. Click in the cell for the desired parameter, or click and drag to select a range of cells.
  3. Press Set.
  4. Choose a path from the displayed list shown below.
  5. The In path is applied when the fixture is increasing in intensity during the cross-fade, and the Out path when the fixture is decreasing in intensity.
  6. Press OK.

Path Selection List Editor

The different types of path are explained in Paths.


13.3.4 Fanned Timings

You can fan timings across multiple fixtures, just as you can fan colour or position. For example, to fan times across 10 fixtures:

  • Fanned Timings
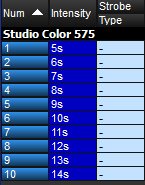
  • Similarly, you can fan delay times:

    For more on fanning, including fanning using the parameter wheels and in spreadsheet views, see Fanning.