SmartSpace Controller - Gen 2
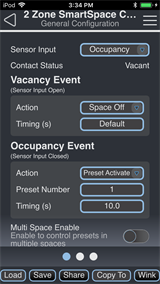
SmartSpace Controllers are available in single- or dual-zone 120/277V configurations and provide on/off functionality for all types of lighting fixtures up to 20 amps, offer 0-10V dimming for direct control of compatible LED drivers and fluorescent dimming ballasts, provide 24 VDC power to an auxiliary device (such as an occupancy sensor), and receive dry contact input to initiate control events across the system. The EchoAccess App provides configuration of the SmartSpace Controller features. The dots at the bottom of the screen indicate additional pages of configuration. Swipe left or right to access Configuring the Event Actions or Configuring the Circuits and Preset Fade Times.
Use the drop-down menus and keypad to set the Event Actions and any additional options that display according to the action selected.

-
Sensor Input - use the drop-down menu to select Disabled, Occupancy, or Photo.
-
Contact Status - a read only status of the auxiliary input, based on the type of Sensor Input that is configured.
- Disabled - displays Contact Closed/Contact Open.
- Occupancy - displays Occupied/Vacant.
- Photo - displays Contact Closed, Dar /Contact Open, Bright.
The Multi Space Enable switch will display for specific configurations allowing you to choose multiple spaces to which these actions will be applied.
- for Occupancy Sensor Input if the Vacancy Event Action is set to Preset Activate or Space Off and the Occupancy Event Action is set to Preset Activate
- for Photo Sensor Input if the Bright Event Action and Dark Event Action are set to Preset Activate or Space Off
Vacancy Event (Aux Contact Open +30 seconds)
Note: A Gen 2 SmartSpace controller builds in a 30-second vacancy timeout upon receiving a vacancy command via the contact closure to avoid false vacancy triggers.
Use the drop-down menu to set the event Action that will take place when vacancy is detected.
Occupancy Event (Aux Contact Closed)
Use the drop-down menu to set the event Action that will take place when occupancy is detected.
Bright Event (Aux Contact Open)
Use the drop-down menu to set the event Action that will take place when the Contact Status is in Bright state.
Dark Event (Aux Contact Closed)
Use the drop-down menu to set the event Action that will take place when the Contact Status is in Dark state.
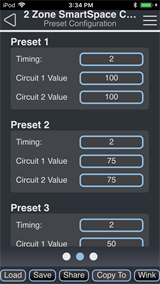
Swipe to the left or right to access the Preset Configuration page and set the default timing and circuit values for each programmed preset.

- Timing - use the keypad to set the preset fade timing used for all configured circuits in this preset.
- Circuit # Value - use the keypad to set the intensity level for each individual circuit in this preset.
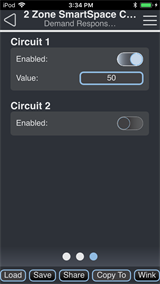
Swipe to the left or right to access the Demand Response page and enable or disable demand response for each circuit. Enter a Value between 0 and 99 to set the highest output level when Demand Response is Enabled.

Configuration Sharing
Five buttons are available at the bottom of the configuration screen
Note: Share is only available in the EchoAccess Mobile App.