Light Sensor
The Echo Light Sensor (also known as a Photo Sensor) provides light level measurement and lighting control for the connected Echo control system. The sensor measures lighting conditions to maintain a programmed lighting output in both dimmed and switched systems. Light Sensors are available in either black or white finish:
| Echo Light Sensor | |
|---|---|
| E-LS | Light Sensor head with controller |
| E-LSC |
Light Sensor controller Only |
| E-LSH | Light Sensor head Only |
Each Light Sensor controller supports one or two Light Sensor heads. A Light Sensor head may be installed within the controller or installed remotely, using up to 1,000 feet (304m) of 16 AWG (1.3mm2) wire per controller. When using a pair of Light Sensor heads, both sensor heads transmit their light readings to a single Light Sensor controller. The controller averages the levels and uses them to control lighting within the space.
Reference the
Configuring the Light Sensor

Use the drop-down menus and keypad to set the configurable features.
Note: Changes made to the Light Sensor configuration settings using the EchoAccess App impact the behavior of the sensor when Custom Config mode has been enabled (set to On). The Custom Config mode DIP switch is located on the circuit board (rear side) of the sensor. A sensor placed in Basic Config mode (Custom Config DIP switch set to Off) is unaffected by EchoAccess App custom configuration settings.
Note: If Off is played from a station, light sensor events will not turn lights on.
- Current Measurement (read-only) - displays the Current Measurement (lux), Lower Threshold, and Upper Threshold (lux) of light of the sensor.
- The Lower Threshold and Upper Threshold are calculated from the
- Threshold values can be calculated by adding or subtracting the Photo Deadband fraction of the Target Lux Value to or from the Target Lux Value.
- Lower Threshold = Target Lux Value - (Target Lux Value x Photo Deadband)/100
- Upper Threshold = Target Lux Value + (Target Lux Value x Photo Deadband)/100
- The Lower Threshold and Upper Threshold are calculated from the
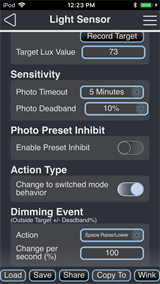
- [Record Target] - tap to use the current lux measurement as the Target Lux Value.
- Target Lux Value - the current recorded target lux value, which can be manually adjusted (tap the value to manually adjust).
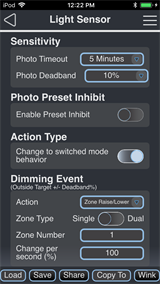
- Photo Timeout - set the length of time the Light Sensor waits before triggering the next action. Any manual lighting control in the space will reset this time. Options include 5 minutes, 15 minutes, 30 minutes, and 60 minutes.
- Photo Deadband - this setting determines the Upper and Lower Thresholds discussed above, which limit how large the difference between the Target Lux Value and the Current Measurement can be before the sensor takes action. Photo Deadband is expressed as a % of the Target Lux Value.
- Photo Deadband = (Current Measurement - Target Lux Value/Target Lux Value) * 100
Photo Preset Inhibit prevents light sensor event actions if one of a user-defined list of presets is active or was the last preset played. When the Enable Preset Inhibit switch is enabled, a list of presets will appear. Tap the box to the left of each preset in the list to choose presets that will override photo control events.
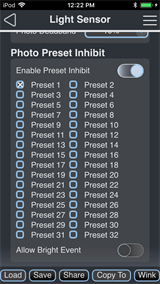
- Allow Bright Event (switched mode) and Allow Lower Event (dimmed mode) - when this switch is enabled, lower or bright actions will not be affected by Daylight Exempt Presets, but raise and dark actions will be inhibited. When this switch is disabled, all raise, lower, bright, and dark actions will be inhibited by the Daylight Exempt Presets.
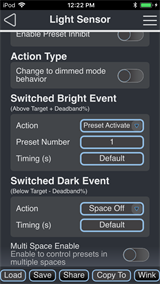
Action Type
Deactivate the switch for Switched mode, or activate the Action Type switch for Dimmed mode, and configure their related actions.
In switched mode, the sensor provides configuration of a Switched Bright Event and Switched Dark Event, each with configurable actions.
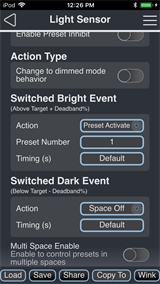
- Switched Bright Event - when measured light exceeds the Bright threshold (Target Lux Value plus Photo Deadband %), the Switched Bright Event Action occurs. Use the drop-down menus and keypad to set the event action, the preset associated with that action, and the timing of the preset fade.
- Switched Dark Event - when the measured light is below the Dark threshold (Target Lux Value minus Photo Deadband %), the Switched Dark Event Action occurs. Use the drop-down menus and keypad to set the event action, the preset associated with that action, and the timing of the preset fade.
In dimmed mode, used for daylight harvesting installations, the sensor provides a Dimming Event that can be configured for either Space Raise/Lower or Zone Raise/Lower. When the measured light is found to be outside the set Photo Deadband, the sensor will continuously trigger Dimming Raise Events and Dimming Lower Events until the Target Lux Value is reached or artificial lighting reaches its maximum levels.
Note: Raise/Lower Event actions provide a "Change per second (%)" setting that is the amount of control applied per second while lux measurements are outside the Photo Deadband threshold. 1% is the default setting, meaning the lighting will change in 1% increments. Higher values equal a faster artificial lighting change.
Setting the Dimming Event to Space Raise / Lower maintains the entire Space at the set Target Lux Value +/- the
Setting the Dimming Event Action to Zone Raise/Lower provides additional settings to determine if the zone type is a single or dual controlled zone.
Selecting Single Zone Type provides options to set the Zone Number and the Change per second (%) rate.
Setting the Zone Type to Dual allows the Light Sensor to control two zones, a primary and a secondary, at different levels when issuing Dimming Event Raise/Lower commands. The sensor should be placed in the Primary zone.
The Primary Zone is the master, providing the Secondary Zone with Raise/Lower commands using a user-configured Daylight Exposure offset.
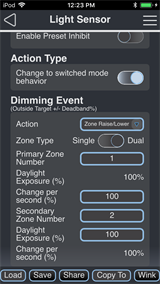
Daylight Exposure (%)Daylight Exposure (%) is the percent contribution of ambient daylight to the zone. is set to 100% for the Primary Zone Number and cannot be changed. The Primary Zone Number has the highest possible capacity for ambient daylight exposure, and this is the location where the Light Sensor will be sampling light. The Secondary Zone Number Daylight Exposure (%) setting is user configurable.
- Set the Primary Zone Number.
- Set the Change per second (%) rate for the Primary Zone Number.
- Set the Secondary Zone Number.
- Set the Daylight Exposure (%) for the Secondary Zone Number (allowed range 10-100%). This number represents the percentage of perceived ambient daylight at the Secondary Zone as compared to the Primary Zone.
- The Change per second (%) setting for the Secondary Zone is read-only and automatically adjusts according to the relationship between the Daylight Exposure (%) in the Primary and Secondary Zone, as well as the Primary Zone Change per second (%) setting.
Configuration Sharing
Five buttons are available at the bottom of the configuration screen
Note: Share is only available in the EchoAccess Mobile App.