Whereas direct selects display lists of specific target types, custom direct selects allow you to create a list with individual targets, regardless of type. The custom direct selects editor allows you to choose the targets used in these lists, and apply them to a configurable grid.
To open the custom direct selects editor, select the custom direct selects icon on the Workspace Layout Menu, or use [Tab] [3] [9]. You can also choose {Custom} on the direct selects tab, and then selecting {Open Custom DS Editor}.
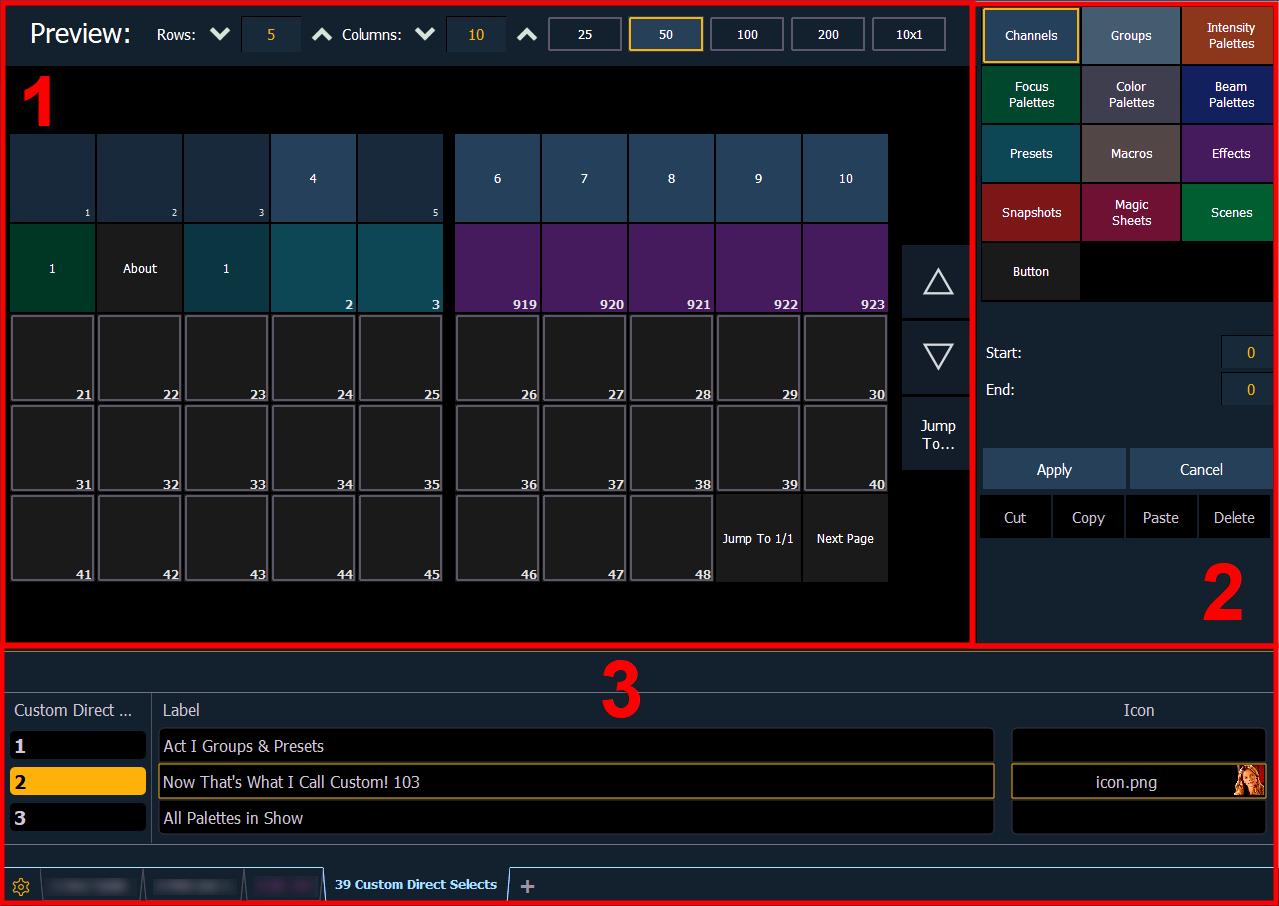
The editor is divided into a preview of your custom direct selects grid, a target selection menu for configuring buttons, and an index of all custom direct select lists in your show file.
Custom direct select lists can be any number between 0.001 and 9999.999.
This section displays the custom direct select list, laid out on a customizable grid for you to preview layouts. The options at the top allow you to adjust the number or rows and / or columns in your custom direct select grid, or choose from preset grid layouts.
This section allows you to configure which direct select targets are assigned to your custom direct select buttons. All buttons default to empty.
This section displays an index of all the custom direct select lists in your show file. These lists can be assigned a label, as well as an icon.
Note: Custom direct selects created in Eos software prior to v3.1.0 and stored in snapshots will be automatically converted to a custom direct select list, labeled with the relevant snapshot number.
To assign targets to your custom direct select list, select one or more buttons in the grid. You can select multiple buttons at once by selecting them sequentially, or dragging to lasso a marquee around them.
Note: The order in which the buttons are selected will determine the order that targets are applied to those buttons.
Once the desired buttons are selected, choose a direct select target to assign to those buttons. You must define a starting number for the selected target. When a single button is selected, defining an ending number will assign that range of targets to the grid, starting with the selected button.
Example:
Selecting Button 1 and the Channels target with a range starting at 10 and ending at 14 will assign Channels 10-14 to Buttons 1-5.
When multiple buttons are selected, the same number of targets as buttons selected will be assigned. You can define an offset instead of an end to distribute targets evenly across the selected buttons.
Example:
Selecting Buttons 11-15 and the Presets target starting at 1 with offset 2 will assign Presets 1, 3, 5, 7, and 9 to Buttons 11-15.
Select {Apply} to assign the specified target(s) to the specified button(s). The specified target(s) can also be copied to additional buttons in any custom direct select list using {Copy} and {Paste}. Once {Copy} is selected, the targets to be copied will be noted at the bottom of the target selection menu.
Checking the "Include Non-Existant Whole Number Targets" box allows you to map buttons for targets that do not exist yet. If the box is left unchecked, only existing targets will be mapped. This box is checked by default.
This target, unique to custom direct selects, allows you to place console buttons on your custom direct select grid. The following options are available:
Icons can be assigned via the softkey {Icon}, or by clicking on the Icon field in the target table. This opens the icon library.
Any existing icons in your library will appear first, along with stock icons. You can also access additional default icons using the additional tabs below the icon library. Common fixture icons are available in the adjacent tab to the right. Select an icon to assign it to the specified target. To close the icon library, clear the command line, or select Close.
For more information, see Icons.
You can clear a custom direct select by selecting the button(s) and pressing {Delete}. You can also hold down [Escape] and press the direct select that you want to clear.
To delete a custom direct select list, use [Delete] [#] [Enter] [Enter], where [#] is the list number.