Open topic with navigation
Smart Assign Control Function
The Smart Assign Control Function is an advanced user feature that allows multiple control and indicator assignments to be applied based on the order of selection to incrementally apply object assignments. Consider this as a way to assign multiple controls / indicators with functionality as a single operation (avoiding repetitious selection of objects).
For an example, you have a six button Inspire station which you want Button 1 assigned to Preset 4 and Buttons 2 through 5 as consecutive presets.
To Smart Assign the control function, do the following:
- From the Program/Simulate view, open the station in simulation by double-clicking the station icon in the Plan workspace or the Browser. A graphical representation of the selected station displays in a new floating window (see example of an Inspire 6 Button station below).
-
Select all of the controls on the station by pressing (Ctrl) + (Alt) and clicking each of the controls. A selected control will outline in red.
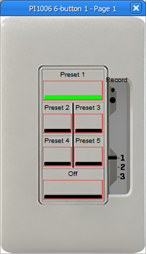
The selection order of the controls is very important for this feature. Functions are assigned in the order of selection. For this example, if you select Button 1, then Button 5, then Button 2, 3, and 4, then assign the presets starting at Preset 4; Button 1 will be Preset 4, Button 5 will be Preset 5, Button 2 will be Preset 6, etc.
Indicator functions are also incremented in the same way, so if a Preset Activate (LTP) action with an indicator function of Preset Status (LTP) is Smart Assigned or Smart Pasted, the preset will increment for both the action and indicator function.
- Right-click on any control on the station or on the control in the Browser and select "Smart Assign Control Function". The "Set Control Function" dialog displays.
- Set the control function of the first control selected from the "Control Function" drop down menu. The control function options depend on the selected control type, button or fader. When the control function is selected, the description of the control function displays next to the drop down list and the default action type (Button Down, Button Up, etc.) is selected and the object type list populates with the related object types for the selection.
- Filter the available object control options in the list by selecting an object type from the "Object Type" drop down menu for each action.
- For each default action type (Button Press, Button Action, Button Up, Button Down, Turn On, Turn Off, etc.) that is defaulted by the control function, select the object type from the first column (e.g. Preset Activate (LTP). The second column of filtering criteria will populate depending on your selections. Continue selecting from the columns of data until the final object has been set.
-
Click [OK]. All controls on the station have been "Smart Assigned" with the controls.
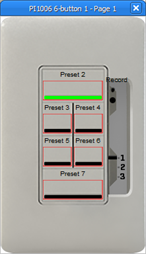
Functions are incremented through the use of specific object directories (fixtures, stations, presets, sequence steps, spaces, processors, etc.). When objects are added to a project, they are added into their object directory and can be incremented. The object corresponding to the next user number is used, and if the incrementing reaches the end of the directory, then the last object is used again.
To redirect our example above, if we had only six presets total in our system, set Button 1 at Preset 2 and used the "Smart Assign" feature, incrementally this would Smart Assign Buttons 5 and 6 to Preset 6.