Open topic with navigation
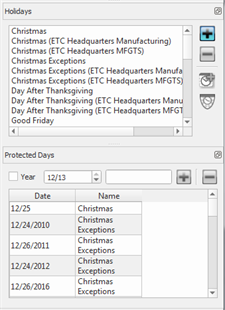
Holidays
Creating a holiday allows you to add a day type into your recurrence list. You can then create events that play on that day whenever it is set to occur. This can be used for holidays, school calendars or any regularly reoccurring days that require a special series of events.
Create a New Holiday
-
Create a new holiday by selecting the "Create Holiday" icon  in the Holidays section. The "Create Holiday" dialog displays.
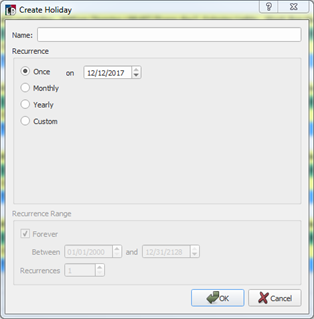
- Specify the new holiday name in the "Name:" box.
- Select the holiday recurrence from the available radio buttons.
- If "Once" is selected, specify the date as well (mm/dd/yyyy).
- If "Monthly" or "Yearly" is selected, specify which day, or week and day of the week, the holiday is in effect.
- If "Custom" is selected, specify the specific date (mm/dd/yyyy) the holiday is effective.
- When "Monthly" or "Yearly" is selected, specify the "Recurrence Range" and the number of "Recurrences". If the recurrence has no end date or set number, select the "Forever" checkbox.
- Click [OK] to close the "Create Holiday" dialog. Notice the new holiday is listed in the "Holidays" list.
Import Protected Days and Holidays
LightDesigner provides the tools to import an ".ics" file including the holidays and special events you require in your configuration. An .ics calendar file is a standard filename extension used to designate a file containing calendar and schedule information. Some example programs that utilize the .ics file format include; Apple Computer Inc. iCal, Google Calendar, Microsoft Exchange and Outlook, and Yahoo! Calendar (source from Wikipedia).
Importing holidays (.ics calendar file) into LightDesigner does not apply any default actions to them, it simply adds events with a defined date range for later assignment.
- From the Timed Events view, select the "Import Holidays" icon
 located in the toolbar. The "Import Protected Days and Holidays" dialog displays.
- Browse to the file location and select the .ics file for import.
- Press [Open]. A dialog will display confirming the import action was successful. Click [OK.
- All holidays in the imported calendar will populate into the Holidays and Protected Days listing in the Timed Events view of the configuration. You can now create a new timed event on a holiday, protect a holiday, or delete a holiday or protected day from the lists.
- If the imported data includes recurring events for more than one year, multiple holidays with the same name will display in the Holidays list. For instance recurring Religious holiday "Easter Sunday" which occurs on a different Sunday every year will display multiple times in the listing. The first occurrence in the list is the most recent, or the first to occur.
- If the .ics file includes only a single year of events with no recurrences set, only one instance of each holiday will be included in the Holidays list.
- A recurring holiday that occurs on a particular day every year will display only once in the Holidays list. For example, "April Fool's Day" which will occur every April 1st.
Delete a Holiday or Remove a Protected Day
Create a Timed Event on a Holiday
Creating a timed event on a holiday is near identical in process to creating a new timed event. The slight difference between the two event creation procedures is the recurrence settings which are set according to the holiday selected.
- Select the holiday from the "Holidays" list and click the [Create Timed Event on Holiday] button
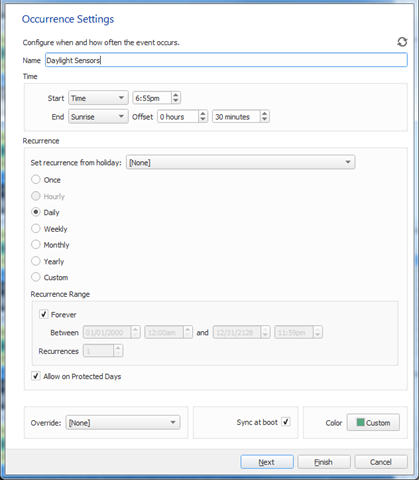
 . The "Create Timed Event" dialog displays with the recurrence settings populated with the selected holiday settings.
- Provide a name for the new timed event in the "Name:" section.
- Set the start time for the new event. You may specify a specific time or an astronomical sunrise or sunset with offsets in hours and minutes.
- Set the end time for the new event. You may specify a specific time, a duration or an astronomical sunrise or sunset with offsets in hours and minutes.
- The "Recurrence" settings are already specified by the holiday recurrence setting. If the new timed event should be allowed on "Protected Days", select the "Allow on Protected Days" checkbox.
The "Recurrence" settings are specified by the holiday selected in step 1.
Allow on Protected Days
Selecting the "Allow on Protected Days" checkbox sets this new Timed Event as an override to the Protected Days feature. This feature would be most likely used for an event that you want to run, regardless of a protected day set in the calendar. For example, a nightly "Off" sweep of the lights in a building.
Color
The [Color] button is actually a color selection tool that provides color designation, similar to categorizing with color, for the timed events in the weekly and daily Timed Events views.
Protect a Holiday
Protected Days prevent recurring timed events from playing, while allowing timed events specific to that protected day to play according to their schedule. Said another way, they are a way to create exceptions to recurring timed events. LightDesigner provides a button, located in the "Holidays" section of the Timed Events view, that allows you to easily protect a holiday.
Select the holiday from the "Holidays" list and click the [Protect Holiday] button  . The selected holiday copies into the "Protected Days" section.
 Related Topics