
Hog consoles have ten physical playback masters that cuelists, scenes, batches, and inhibitive submasters (groups) can be attached to for playback. Each physical master has one set of physical controls: a fader, a Play key, a Pause key, a Go Back key and a Flash key. Additional physical playback masters can be added to your console by adding a playback wing or executor wing. The following sections will cover how to configure and attach playback objects to physical masters and how to manipulate what the physical controls of a master are assigned to do.
Cuelists, Scenes, and batches are automatically attached to a master when you create them using the Record, Choose syntax; see Recording to a Cuelist on a Master. However, if the cuelist, scene, or batch was created using the directory window then follow these steps to attach it to a physcial master:
List 1 Move Choose : attaches Cuelist 1 onto the chosen master.
Scene 1 Move Choose : attaches Scene 1 onto the chosen master.
Tip: You can move a cuelist, scene, or batch to multple physical masters on a single page as well as across multiple pages. See Pages.
Moving a cuelist between masters will detach it from its original master, and attach it to the new master. Copying a cuelist will leave the cuelist in its original location and attach a copy of the cuelist to the new location.
To move a cuelist:
To copy a cuelist:
To detach a cuelist from a master:
Delete + Choose : detaches the cuelist from the chosen master.
Note that this will not delete the cuelist itself or remove it from the cuelist directory, only detach it from the master.
Once attached to a physical master, cuelists, scenes, and batches can be played back using the hardware keys located below the physical master's choose key as well as via the console's main playback keys (located to the right of master 10 on Hog 4 / Full Boar 4, located to the left master 1 on Road Hog 4, and located to the right of master 5 on HedgeHog 4).
Hog 4 OS uses mappings called "control sets" to define which playback commands are executed when a hardware key is pressed. Every cuelist, scene, and batch has five interchangeable master control sets (standard, intensity, playback rate, effect rate, effect size) and one main control set. This following two sections will cover how to access and customize these control sets as well as how to use them in playback.
Tip: Holding down the PIG key while pressing any one of a master's playback keys will release that master regardless of the function assigned to that key.
Every cuelist, scene, and batch has five interchangeable master control sets (standard, intensity, playback rate, effect rate, and effect size) which contain playback command mappings for the physical master's Go, Halt/Back, Back, Flash, and Fader controls. When a cuelist, scene, or batch is attached to a physical master, the standard control set is used by default.
To configure the master control sets for a cuelist, scene, or batch already assigned to a physical master hold the pig key and then press the [choose] key coordinating with physical master to which the lists/scene/batch is assigned.
To configure the master control sets for a cuelist, scene, or batch not already assigned to a physical master open the master window using the open syntax (example: [List] [1][Open]) and then press the options button at the top of the master window.
To change the master control set used by cuelist, scene, or batch when it is attached to a physical master, hold the choose key for the physical master and select a different control set using the button menu located above the fader. The active control set will be highlighted in blue.
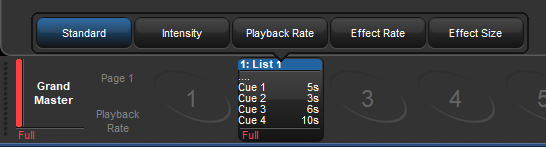
The fader assignment for the currently active control set on a physical master can also be hot-swapped without needing to access the master options window. To hot-swap the fader for a contol set, hold choose and press one of the onscreen encoder wheel toolbar buttons (located above the encoder wheels). The current fader assignment for the active control set will be indicated with a blue outline. For example, in the figure below the current fader assignment for the active control set is intensity (outline in blue). Pressing on the "playback rate" encoder wheel button using the touchscreen or mouse would switch the fader assignment under the current control set to scale playback rate.

Tip: Pressing or clicking on the Playback Bar is equivalent to pressing that master's Choose key.
The main playback controls, typically positioned to the right of master 10 act upon the currently chosen master as well as any selected masters. The playback commands executed by the main controls are configurable for each cuelist, scene, or batch.
To configure the main controls for a cuelist, scene, or batch already assigned to a physical master hold the pig key and then press the [choose] key coordinating with physical master to which the lists / scene / batch is assigned. Navigate to the "main" tab.
To configure the main controls for a cuelist, scene, or batch not already assigned to a physical master open the master window using the open syntax (example: [List][1][Open]) and then press the options button at the top of the master window. Navigate to the "main" tab.
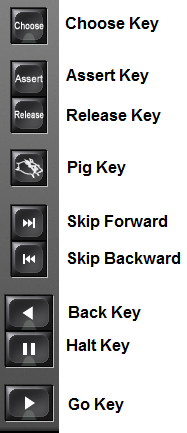
Below is a list of the commands that can be assigned to the playback keys within a physical master control set and the main controls:
| Commands assignable to all keys: | |
|---|---|
| Command | Options and Notes |
| None | Disables the control |
| Assert | Asserts the master. Deselect Use default cuelist time to enter your own assert time for the master, overriding the cuelist's assert time. |
| Release | Releases the master. Deselect Use default cuelist time to enter your own release time for the master, overriding the cuelist's release time. |
| Go |
Go's the master. Deselect Use default cuelist time to enter your own fade time for the master, overriding the cuelist's time. |
|
Halt |
Halts the master, stopping any fades that are in progress. Select Use Fade Time to use the previous cue’s fade time when going backwards instead of the cuelist’s Back Time. Select Trigger Cuelist Macro to trigger the previous cue's macro when going backwards. |
|
Back |
Reverses the currently running crossfade. Deselect Use default cuelist time to enter your own back time for the master, overriding the cuelist's back time. |
|
Restart |
Goes to the first cue in the cuelist. |
|
Goto cmdline |
Enters the Goto command into the command line, so that you can enter a cue number and press Enter to go to that cue. |
|
Goto |
Enter a cue number to go to in the Target Cue cell. Deselect Use default cuelist time to enter your own fade time, overriding the cue's time. |
|
Skip forward |
Go instantly to the next cue. |
|
Skip back |
Go instantly to the previous cue. |
| Scale Playback Rate |
Adjusts the playback rate of the master by applying a scaling value to the base playback rate of the master.
|
| Scale Effect Rate |
Adjusts the effect rate of the master by applying a scaling value to the base effect rate of the master.
|
| Scale Effect Size |
Adjusts the effect size of the master by applying a scaling value to the base effect size of the master.
|
| Scale Fader Assignment |
Adjusts scaling based on fader's control assignment. (i.e. if fader is assigned to "Scale Playback Rate" then a button assigned to "Scale Fader Assignment" will scale the playback rate).
|
| Commands Assignable to Fader Control | |
|---|---|
| Command | Options and Notes |
|
None |
Disables the control |
|
I Fader |
The fader controls fixture intensities being output by the master.
|
|
Manual crossfader |
The fader controls the crossfading between cues manually: move the fader to the bottom to ‘pick up’ the next cue, then move it up to start the crossfade. |
| IPCB crossfader | The fader manually controls the crossfading of the intensity, position, colour, and beam parameters of the current cue. When the fader is at the top of its travel the current cue will be 100% crossfaded onto stage. When the fader is at the bottom of its travel the current cue will be completely released. |
| Scale Playback Rate |
The fader adjusts the playback rate of the master by applying a scaling value to the base playback rate of the master.
|
| Scale Effect Rate |
The fader adjusts the effect rate of the master by applying a scaling value to the base effect rate of the master.
|
| Scale Effect Size |
The fader adjusts the effect size of the by applying a scaling value to the base effect size of the master.
|
| Commands Assignable only to the Flash key | ||
|---|---|---|
| Command | Notes | Options |
| None |
Disables the control |
|
| Flash intensity at |
Brings the intensity to a specified level regardless of the assignment of the fader. To specifically flash the assignment of the fader please use "Flash Fader at". |
Level: proportion of the programmed intensity that contents are flashed to. If programmed levels are 80% and the flash level is set to 50% the flashed output intensity will be 40%. Go On Flash : goes the master when the Flash key is pressed. Release on Off: releases the master when the Flash key is released. Solo: sends intensity output of all other physical and virtual masters to zero while the Flash key is held. Latching: action of the Flash key is maintained until it is pressed a second time. * Latching the flash key can also be accomplished even when the latch option is turned off by pressing the pig key while the flash key is held, then releasing the flash key, and then releasing the pig key. |
| Flash Fader at | Flashes fader assignment to level specified in the options. This is similar to "flash instensity at" except it flashes the command assigned to the fader and instead of flashing intensity. | |
| Flash Fader Full | Flashes the command assigned to the fader to its highest level. | |
| Flash Fader Zero | Flashes the command assigned to the fader to its lowest level. | |
| Flash Fader Opposite | Flashes the command assigned to the fader to either is highest or lowest level depending on the position of the fader. Its the fader level is at 50% or higher then flash level is 0%. If the fader level is below 50% then the flash level is 100%. | |