Open topic with navigation
Add a New Page using the "Add Page" Wizard
ControlDesigner provides a wizard to add a page to an existing configuration. The "Add Page" wizard is a quick method to lay out controls on a new page. There are two ways to add a new page to an existing configuration :
- Right-click in the Page Browser and select "Add Page" from the context menu.
- The "Add a Page" dialog is split into three tabular sections including "General", "Layout", and "Navigation".
The wizard is initially set to implement the same settings as the previous page that was created. To create a page with the same settings as the last created page, press [OK]. To cancel the creation of a new page, press [Cancel].
Check "Don't show this dialog again" to suppress the wizard and instead
always use the settings from the last page created when adding a new page to the current configuration. If you choose to suppress the wizard, you can always decide later to display the wizard again by changing the setting from the
Application Preferences dialog.
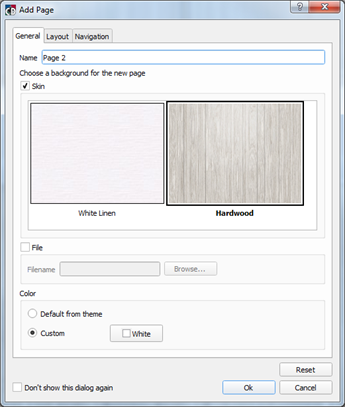
- With the "General" tab in focus, specify a unique name for the first page in the "Name" field.
- Choose a background for the new page.
- Select a background from the skins that are available in the selected theme. A selected skin displays with a black selection box around the image.
- Alternatively, select the "File" checkbox to browse and select a custom skin graphic from another location. ControlDesigner accepts graphic file of type *.png, *.xpm, *.jpg, or *.gif. It is recommended that you do not use images with resolutions higher than that of your configuration.
- From the "Color" section, choose a background color to be used on the page.
- By default, the background color is supplied in the theme and "Default from theme" is selected.
- If you require a color that is different from the default color provided in the selected theme, choose "Custom", then select the colors box for a selection of basic colors and HSV, RGB, and HTML color mixing options. See Page Backgrounds for more information as needed.
Click the [Reset] button to clear the options on the page back to the selected theme defaults.
- Click on the "Layout" tab. This display allows you to add controls to the new page you have just created.
- Click "Add Controls" to enable the space layout templates.
- Choose the layout that closely fits the display requirements for your touchscreen from the template options.
- Click to select an area of the layout and specify the input control parameter that will define the widgets in that area from the drop down box (Button, Fader, or None).
- Also specify how many rows and columns of that input control you want displayed in that particular area of the layout. For instance, two rows of buttons, two columns wide (would equal 4 buttons in total for that specific area).
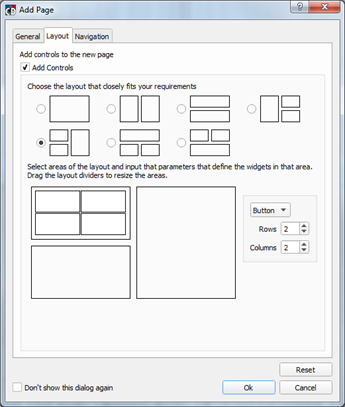
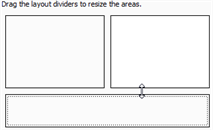
TIP: You can drag the dividers around to assign the desired proportion of the page to each area.
↕
- Repeat for the remaining areas on the page.
- Click on the "Navigation" tab. This display allows you to add navigation buttons (Next, Back, etc.) to the new page you have created. Navigation buttons allow movement between pages of the configuration on the Paradigm Touchscreen or Virtual Touchscreen.
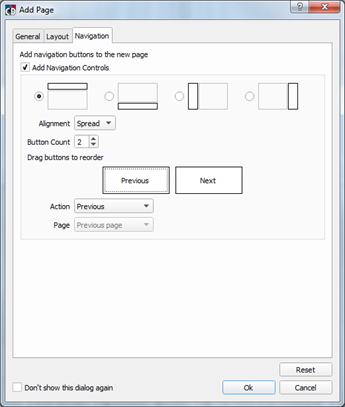
- Click the "Add Navigation Controls" checkbox to enable navigation controls.
- Select the radio button of the page location you want to add the navigation controls.
- Select the alignment for the controls from the options in the "Alignment" drop down box.
- Select the total number of navigation buttons required (limited to 3 total).
- Click to select a navigation button and reassign its control using the options in the "Action" and "Page" drop down boxes .
- As needed, click to select the navigation buttons then drag them to reorder them, resulting in the order they should appear on the page .
 Related Topics