In addition to the conventional command line, the Hog 4 OS uses a graphical user interface similar to those found on personal computers. The advantages of the graphical user interface are far-reaching, and will become fully apparent as you get more familiar with Hog 4 OS.
Key features of the GUI are:
You can work with on-screen controls and windows using the touch screen or through a pointer controlled by the built in Trackball, or an external mouse. Left-clicking the mouse is the same as touching the screen and is used for selecting or activating controls, while right-clicking brings up a context-sensitive range of menu options.
The Soft Keys adjacent to the touch screens provide another method of accessing functions, changing to match whichever toolbar is docked along that edge of the screen.
The graphical environment is highly customisable, giving you complete control of the console and individual window layout. For example, you can rearrange column headers in list windows (e.g. the Cuelist and Programmer windows) to prioritise information that is most pertinent to a specific show or user. Information displayed can also be sorted or filtered. When a user logs out these preferences and settings are stored, and retrieved again on logging in.
Windows can be opened in five ways:
Press and hold on the touchscreen: Press and hold on any empty section of the touchscreen (double click also works); this will bring up a menu window which contains button options for converting the menu window into a system window such as the programmer or output window. The initial size of the menu window depends on where you press the screen. For example, pressing and holding in one of the four corners of the screen will opens a quarter sized menu window while pressing and holding in the middle of the screen close to the Hog 4 logo will open a menu window that is full screen.
From a Toolbar: Some windows may have a dedicated button that can be pressed; the Programmer, for example.
With the Open Key: To open a window using console keys, hold down Open and press the window's associated key or button. For example:
Open + Position : opens the Position Directory window.
Open + List : opens the Cuelist Directory window.
Open + Choose : opens the Cuelist window for the chosen master.
You can also hold down the Open key to gain access the second level of the main toolbar with buttons for many of the console's windows, such as the Output and Parked windows.
From the Command Line: You can specify the window to be opened using the command line, and then press the Open key. For example:
Position
5Open : opens the editor window for Position Palette 5.
Cue
4 / 8Open : opens the editor window for Cue 8 in the cuelist on Master 4.
Double Pressing Keys: You can also open some windows by double-pressing the appropriate key:
Position, Position : opens the Position Directory window.
![[Tip]](../images/tip.png) | Tip |
|---|---|
If you prefer not to use the double-press shortcut to open windows, then assign the double-press time to zero to disable it: see Keys and Button Preferences. |
Windows can be closed using the  button located at the top right of the window. Windows can also be
closed by pressing
Open + Backspace.
The Window Control Toolbar is located at the top of the right-hand touch screen and provides a quick and easy way to manipulate windows. Its functions are also available as keyboard shortcuts.
| Button | Function | Shortcut |
|---|---|---|


| Page Up, Page Down, Page Left and Page Right scroll the currently selected window. The cursor isn't moved. | |

| Copy creates a copy of the selected window. This is helpful when you need to view two parts of the same window at once. | Open + [slash] |

| Size rotates through a range of set positions and sizes for the selected window within its current screen. The options are full screen, and top, bottom, left and right half and quarter screens. Holding down the Pig key while pressing Size rotates through the options in the reverse order. | Open + [plus] or [minus] |

| Move Screen moves the selected window between touch-screens and external displays. | Open + @ |

| Maximise toggles the size of the currently selected window between full screen and its previous size. | Open + Full |

| Focus switches between windows in turn, bringing each to the front. | Open + Thru |

| The unlock button allows the positions and sizes of all windows to be changed by the Trackball or mouse (but not the toolbar buttons). Windows are unlocked when this button is enabled. | Open + . |

| Close closes the front-most window. | Open + Backspace |
To move a window, click and hold on the window's top status bar whilst dragging it to its new position. To move a toolbar click and hold its left-hand edge and drag to its new position.
Windows can be resized by clicking and holding on corners until the resize arrow appears. You can then drag the corner to make the window bigger or smaller.
Note that you can only use the mouse or Trackball to move and resize windows if you
have unlocked them with the  button on the window control toolar. Keeping the windows locked is
useful when using the touch screens, so that you do not accidentally drag or resize
windows with their title bars or borders. You can still move and resize windows with the
buttons on the toolbar.
When a window's contents is too great to fit inside the window, scroll bars appear along the right and bottom edges of the window. You can scroll by pressing or clicking and then dragging on the scroll bar's slider, or by pressing or clicking on the arrows at the ends of the scroll bar.
In addition, you can scroll window contents by holding down the Open key and using the Trackball, I-Wheel or parameter wheels to scroll.
Desktop views allow you to store arrangements of windows for quick access so you do not have to re-open and re-arrange windows to perform specific tasks. For example, you could create a programming view that shows the group, palette and effects directories along with the Programmer window. A playback view could display the cuelist and scene directories, and the Output window.
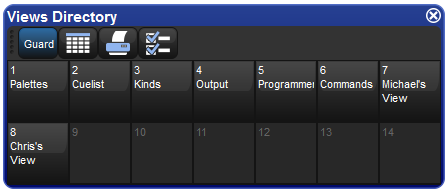
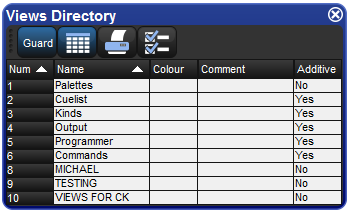
Desktop views are managed by the View Toolbar at the top of the left-hand touch screen (see Figure 2.1, “The View Toolbar”) and the Views Directory (see Figure 2.2, “The Views Directory”). You can open the Views Directory by holding down the Open key and pressing the View button on the View Toolbar.
![[Tip]](../images/tip.png) | Tip |
|---|---|
When you create a new show, it automatically contains desktop views for palettes, cuelists, output and the Programmer. |
To record a desktop view using the View Toolbar:
Arrange the console's windows as you want them stored in the desktop view.
Hold down the Record key and press one of the numbered buttons on the View Toolbar.
To name a desktop view using the View Toolbar:
Press the Set key together with the appropriate button on the View Toolbar. The Quickname window will open.
Enter a name, and click on OK.
To name a desktop view using the Views Directory:
Open + View : opens the Views Directory.
Select the button for the view you want to name. Make sure that the Guard button is depressed, otherwise you will activate the view instead of just selecting it.
Press the Set key. The Quickname window will open.
Enter a name, and click on OK.
![[Tip]](../images/tip.png) | Tip |
|---|---|
You can also assign view names, and add comments to them, in the spreadsheet view of the Views Directory. See Desktop View Options. |
You can recall desktop views in two ways:
With the View Toolbar: located at the top of the left hand screen. The views each have their own button, and are loaded in pages of ten onto the toolbar. You can load the next page by pressing the Next button at the right hand end of the toolbar, while Pig + Next loads the previous page.
With the Views Directory window: press the view's button in the Views Directory window. Make sure that the Guard button is not depressed, otherwise you will only select the view, rather than activating it.
By default, when you recall one desktop view it replaces the previous one, so that all windows not part of the new view are closed. However, you can set views so that they are additive instead:
Open + View : opens the Views Directory.
Select the directory's spreadsheet view.
Select the view's cell in the Additive column.
Press the Set key to toggle between Yes and No.
To delete a desktop view using the View Toolbar:
Hold down the Delete key and press the appropriate button on the View Toolbar.
Press OK to confirm.
To delete a view using the Views Directory:
Open + View : opens the Views Directory.
Check that the directory's Guard button is depressed, so that you can select buttons within the directory without activating them.
Press the appropriate directory button and then the Delete key.
Click OK to confirm the delete.
![[Tip]](../images/tip.png) | Tip |
|---|---|
If you prefer not to be asked to confirm the delete action, select Don't Ask Me Again in the confirmation window. You can re-enable the confirmation by going to Setup → Preferences → Programming and selecting Confirm before deleting directory items. |


