Open topic with navigation
Create, Record, Edit and Apply a Palette
A palette is a special preset or a reference preset. A palette is similar to a preset in almost every way except that it can be used by other presets to capture a commonly used look.
Users create palettes with any particular attribute group (such as color, beam, focus, and intensity). For example, palettes of color for gel strings, or palettes of patterns, or palettes of intensities.
Most importantly, palettes are referenced data. This means that when a palette has been stored as part of a preset, any changes to the contents of the palette will propagate into all presets which it has been referenced. On the other hand, any changes to the palette data within a preset breaks the reference link to the stored palette.
Create a Palette
- To create a palette, first use the simulate features to create the look in your space to be recorded.
- Select the primary space that includes the channels by selecting from the Browser or just click inside the Plan workspace.
- Click the [Create Palette] button
 in the toolbar. All channels in the selected space will be recorded into the palette at their current values. Once created, the new palette will be listed in the Browser and a new icon will display in the Preset Directory.
The channels selected or the current space selected at the time of palette creation specifies the channels that are included / recorded in the palette.
Record a Palette
To record a palette, click the [Record] button  in the toolbar or right-click on the palette icon in the Preset Directory and select "Record Current" or "Record Current (Selected Only)" from the context menu. Record will store the current value for all channels included.
Apply a Palette
Apply a Palette to a Preset
TIP: To create a reference to a palette within a preset, you must first apply the palette while in "Edit" mode for the preset.
- Enter "Edit" mode for the preset by pressing the [Edit] button
 on the preset icon in the Preset Directory.
- Right-click on the palette icon located in the Preset Directory, and select "Apply" or "Apply All" from the context menu.
- "Apply" applies only to a particular channel selection, and "Apply All" applies to all channels included in the palette. Each command is available in the context menu of the palette icon located in the Preset Directory.
The Editor Spreadsheet will display the name of the palette in place of the channel attributes that are referenced by the palette.
- To complete editing, click the [Edit] button on the preset icon or click the [Commit] button
 on the toolbar.
Apply a Palette in Simulation
Applying a palette applies its stored levels to the channels so that you can see in simulation the affects of the palette alone.
Levels are applied without fade when played using the "Apply" command. There are two commands available including; "Apply", which applies only to a particular channel selection, and "Apply All" which applies to all channels included in the palette. Each command is available in the context menu of the palette icon located in the Preset Directory.
To apply any recorded palette click on the [Apply Palette] button  found on the palette icon
  located in the Preset Directory.
The apply function only applies to selected channels. When there is no selected channels, an implicit "Apply All" will occur. This also applies to the "Apply" button on the palette icon.
Edit Mode for a Palette
A recorded palette can be edited to alter characteristics of the palette such as intensity, fade times, delays, and which channels are affected. This can be considered a "blind" edit since changes made in "Edit Mode" are not applied to actual output.
Edit a Palette in Simulation
- Click the [Apply Palette] button located on the palette icon in the Preset Directory. The channels included in the palette will apply the palette values in simulation and display the values in the Editor Spreadsheet.
- Click the "Edit" button on the palette icon to place the palette in edit mode.
- Use the Programmer to change the palette value for all channels in the selection or the Editor Spreadsheet to edit individual channel or fixture parameter values recorded in the palette.
- Click the [Commit] button on the toolbar.
Include/Exclude Channels
There must be a palette selected to see any channel indications.Apply a Palette in SimulationAn excluded channel is displayed in the Plan workspace with a red X and an included channel is displayed with a green check mark.
- To include a channel in a palette, select the channel or channels and click [Add Channels to Preset/Palette]
 from the toolbar.
- To exclude a channel in a palette, select the channel or channels and click the [Exclude Channels to Preset/Palette]
 from the toolbar.
- Alternatively, you may right click on the channel and select the appropriate action from the context menu.
Edit a Palette Using Edit Mode
- To edit a palette, click on the "Edit" button within the palette icon located in the Preset Directory. This places the selected palette into edit mode, simulates the palette in the Plan workspace and updates the parameter values in the Editor Spreadsheet.
- You may add channels to the palette simply by selecting the channels and using the Programmer or typing a value into the Editor Spreadsheet for specific attributes. Alternatively, you may remove attributes or channels by using the knockout button
 . Knockout.
- To finish editing the palette, click the "Edit" button on the palette icon or click the commit button in the toolbar.
The Property Editor states that the palette is "Locked for Edit". This indicates that the property edits on other objects are not allowed until you have exited Edit Mode.
Knockout
The Knockout button provides two functions depending on whether a preset, palette, or sequence is in Edit mode or not.
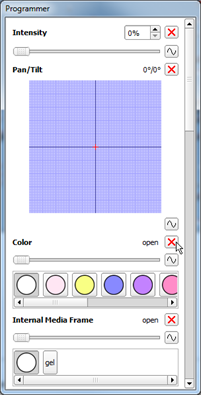
When not in Edit mode, the knockout button simply applies default values for a given parameter. For example 0% intensity, or 0/0 degrees for pan and tilt.
When in Edit mode, the knockout button removes individual attributes of channels from the preset, palette, or sequence step you are editing. For example, to remove pan and tilt from a palette for moving lights, within the Programmer window, click the red "X" next to the attribute you want exclude from the palette.
Be sure to record the new values to the palette by selecting "Record Current" from the context menu.
To reinstate the attribute value, use the Programmer to set a value or use the Editor Spreadsheet to indicate the new value.
 Related Topics