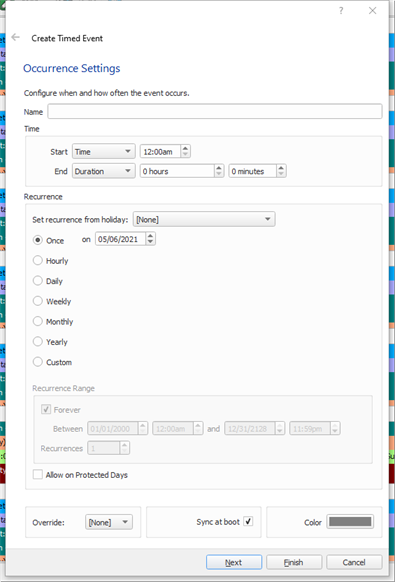
Create New Event

Timed events are created using the Timed Events Wizard.

  1. Click the New Event button in the main toolbar. The "Create Timed Event" dialog displays.

    Timed Events, Create New Event

  1. Specify the new timed event name.
  2. Specify when and how often the new event occurs.
    1. Select whether the Start period will use "Time", astronomical settings ("Sunrise" or "Sunset") or determined by another "Event Offset" from the drop-down menu.
      • If "Time" is selected, specify the specific time of the event in hours and minutes. The clock displays according to the clock preferences set, either 12 hr or 24 hr.
      • If "Sunrise" or Sunset" are selected, specify the hours and minutes offset from the specified astronomical setting the event will take place.
      • If "Event Offset" is selected, specify the event that will trigger this new event from the "Event" drop-down. Include offset if required.
    2. Select whether the End period will be timed, a "Duration", "Time", astronomical setting ("Sunrise" or "Sunset") or an "Event Offset" from the drop-down menu.
      • If "Time" is selected, specify the specific time the event will end in hours and minutes. The clock displays according to the clock preferences set, either 12 hr or 24 hr.
      • If "Duration" is selected, specify the hours and minutes the event will run and before the end event will play.
      • If "Sunrise" or "Sunset" are selected, specify the hours and minutes offset from the specified astronomical setting when the start event will end and the end event will play.
      • If "Event Offset" is selected, specify the event that will cause this new event to end from the "Event" drop-down. Include an offset if required.
  3. Specify the recurrence settings from the available options. "Once" is the default recurrence type set.
  4. Specify the Recurrence Range (if applicable).
  5. If the new event should play regardless of a Protected Day, click "Allow on Protected Days" checkbox.
  6. Specify a configured Override to be enabled with the scheduled timed event.
  7. Specify if the Timed Event should synchronize at boot. When Sync at boot is enabled for a specific timed event, the Paradigm system will include this event in its boot up synchronization (which processes only when its project properties are configured to do so). Synchronization ensures the timed events current state is true after a power cycle.
  8. Select the "Color" that the holiday will display in the Timed Events list.
  1. Click the [Next] button to specify the actions for the new timed event or click the [Finish] button if no actions will be assigned to the new event.
  2. Note: You can create events in LightDesigner that have no action. These will appear in the calendar and can have actions assigned to them later as needed in the Property Editor.

  3. Specify what actions the new timed event will perform.
    1. Choose the Start Action from the drop-down list provided. You can filter the available actions using the Object type drop-down box.
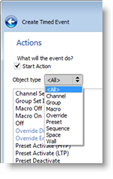
      Timed Events, Create Timed Event Actions, Object Type

    2. Once the Start Action is selected, you must further specify the remaining details of the object including the space, channel, group, or controls that the action affects.

    Note: Actions that require Advanced user access are indicated in blue. If the session of LightDesigner is set to a Basic user, these advanced actions will not display.

    1. Specify the End Action from the list provided. You can filter the available actions using the Object type drop-down box.
    2. Once the End Action is selected, you must further specify the remaining details of the object including the space, channel, group, or controls that the action affects.
  4. Note: If "Duration" equals "0" or "End Time" is equal to the "Start Time", there is no "End Action" to specify.

  5. Click [Finish] to complete the timed event setup. The dialog closes and the new event displays in the Timed Events listing beneath the monthly calendar. When a recurring event has been scheduled, the event will display in the schedule view with a recurring event icon as a visual indication of the event type.
  6. Note: Exceptions can be made to recurring timed events. Reference Timed Event Recurrence Exceptions for more information.