Once fixtures have been added to a show they must be patched so that the console knows where to send control data for the fixtures (the address) and what type of data to send to the fixtures (the protocol). Many fixtures, such as moving lights, are assigned a dmx address and utilize the DMX-512 protocol for remote control of their various parameters whereas other devices such as video switchers are assigned an IP address and utilize IP protocols for remote control of their device parameters. The following sub-chapters provide instructions on how to patch fixtures using these protocols.
The vast majority of moving lights and dimmers receive their control data using a control protocol called DMX-512. Under this protocol, fixtures are controlled via dmx channels and are assigned a dmx address (also known as the ‘start address’). The number of dmx channels occupied by a fixture beyond its start address varies by fixture and by mode so it is important to ensure the fixture type scheduled in the show matches the fixture that is hung the lighting rig.
![[Important]](../images/important.png) | Important |
|---|---|
When the "show details" button is enabled in the fixture window the dmx patch points for a compound fixture's individual parts are displayed, however these internal patch points are fixed and cannot be modified. To identify the true patch point of a compound fixture turn off the "show details" button. |
To patch a fixture using the DMX protocol:
Setup → Patch : this opens the Fixture window.
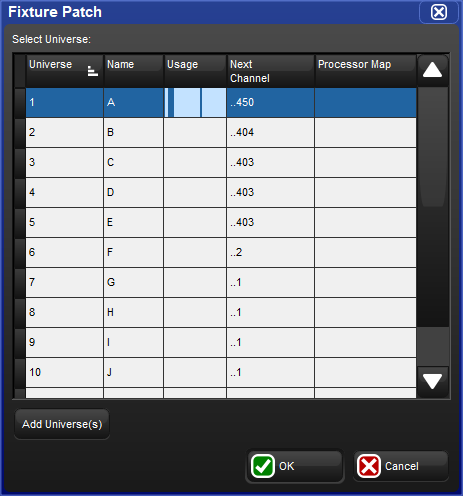
Select a fixture by entering its user number on the command line. Press the Patch @ button to open the Fixture Patch window.
Select a universe from the Fixture Patch window. To patch to a universe that isn't listed, press the button.
Click or press on a DMX universe. The usage column provides a basic graphical view of which addresses are already occupied.
Use the keypad to type in a number for the fixture's DMX start address on the command line. If an address is not supplied on the command line the next free dmx address of the selected universe will be used.
Click on OK or press Enter.
You can also use the keypad to patch fixtures. For example, to patch Studio Color 1 to Universe 4, address 17:
Fixture
1@4/17Enter
To patch further fixtures to the same universe you can use the shorthand:
Fixture
2@33Enter
To patch a fixture at the next available address on the same universe:
Fixture
3@ Enter
If you select several fixtures and patch them, Hog 4 OS will allocate them to a continuous range of DMX addresses, assigning each fixture's patch address so that it follows on from the last.
For example, to patch 5 Studio Colors, starting at DMX address 1:
Open + Fixture : open the Fixture window
Fixture
1Thru5Patch @1, Enter : You can use the @ key as an alternative to the Patch @ button.
Studio Colors 1 to 5 will now have the incremental patch addresses of 1:1, 1:17, 1:33, 1:49, and 1:65. Note that the fixtures selected do not have to be from a contiguous range, and they can be of different types.
![[Tip]](../images/tip.png) | Tip |
|---|---|
When you patch a range of fixtures, Hog 4 OS takes the selection order into account,
so that Fixture
|
You can patch one fixture to multiple different DMX addresses; this can be useful with desk channels, where you want one desk channel to control several dimmer channels. This is sometimes known as ‘soft patching’.
To patch a fixture to a second DMX address, select the fixture again and patch it as before. Alternatively, using the command line:
Fixture [Desk Channel]
1@1/1+2/5, Enter : patches the desk channel to universe 1, address 1, and to universe 2, address 5.
Similarly, you can patch a fixture multiple times so as to fill a specified range of DMX addresses. This can be useful if you want to soft patch a desk channel to a continuous series of dimmer DMX addresses.
Fixture [Desk Channel]
1@1Thru10, Enter : patches the desk channel to each address between 1 and 10.
![[Tip]](../images/tip.png) | Tip |
|---|---|
You don't have to patch fixtures before you start programming. Once the fixtures have been added they can be programmed. However, without a patch you will not be able to output DMX. |
To specify a dmx channel gap when patching press the @ key a second time when the “fixture patch” window is open. This will put the word “Gap” on the command line. Input a numerical value after the word Gap and press enter.
Example:
[1<3 @ 1 Gap 5] will result in the following patch if the fixtures being patched are 3 channels each:
Fixture 1 occupies Dmx channels 1 < 3 (then a five channel gap: 4,5,6,7,8)
Fixture 2 occupies Dmx channels 9 < 11 (then a five channel gap: 12,13,14,15,16)
Fixture 3 occupies Dmx channels 17 < 19
To specify an offset to be used between the start addresses of fixtures when patching press the @ key a third time when the “fixture patch” window is open. This will put the word “Offset” on the command line. Input a numerical value after the word Offset and press enter.
Example:
[1<3 @ 1 Offset 5] will result in the following patch if the fixtures being patched are 3 channels each:
Fixture 1 occupies Dmx channels 1 < 3
Fixture 2 occupies Dmx channels 6 < 8
Fixture 3 occupies Dmx channel 11 < 13
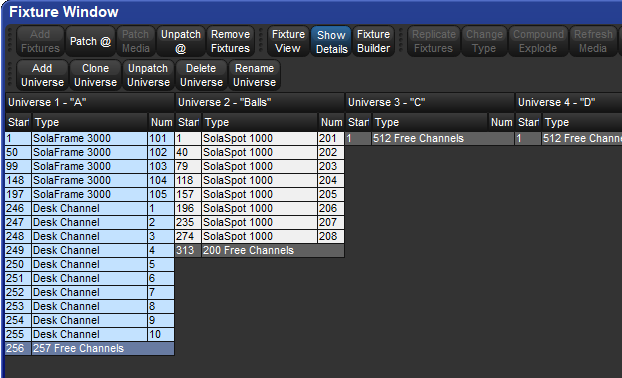
To see an overview of all patched fixtures in the Fixture window enable Universe View button at the top of the fixture window; see Figure 5.2, “The Universe View of the Fixture window”. Universe View shows a spreadsheet with start address, fixture type and user number for each universe. Additional rows show where there is an available space in the allocated addresses. This is useful for finding free address ranges when patching additional fixtures to established universes. To show this view:
Setup → Patch → Universe View.
Press the button to return the Fixture window to its normal view.
Universes must be mapped to processors in order to achieve DMX, Art-Net, or SACN output. To map universes to a processor:
Open the network window.
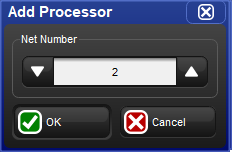
Select a processor from the list of processors and press the button at the top of the network window. If the processor you wish to configure isn't listed in the network window then press the Add Processor button at the top of the network window. The Add Processor window will open. Choose a net number for the new processor and click . Then open the settings window for the newly added processor.
Select the tab of the processor settings window.
Press the button.
Use the Add Mapping(s) dialogue window to specify a range of universes to map and then enable one or more of the mapping type buttons. Press when finished.
The console will now map the universe to the processor using a default set of values. To customize a mapping simply click on any one of its properties in the mapping table and press the key.
Press the or button to confirm and store the mapping.
To remove a processor from a show file:
Setup → → Network : open the Network window.
Right click on the processor you wish to remove from the show file and select the Remove Processor option. A confirmation dialog will open. Press OK to un-map and remove the processor from the show.
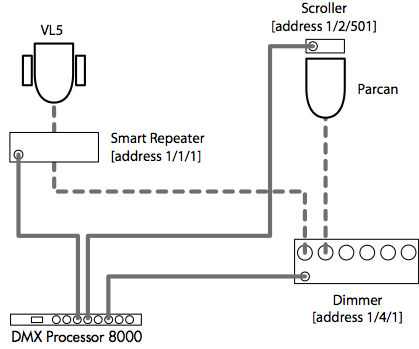
Some fixture types consist of several separate elements that work together, each with their own DMX address. An example is a par-can with a scroller, which operationally you want to treat as a single fixture (‘a light that can change brightness and colour’) but that physically consists of a dimmer-controlled lamp and a colour scroller that have separate and often non-sequential patch points. Similarly, some moving fixtures such as the Vari*Lite VL5 consist of the moving head with its own control electronics, fed by an external dimmer.
With such fixtures, there are two or more DMX start addresses, which may not be numerically adjacent, and indeed may be on different universes and processors. Hog 4 OS handles this by giving these fixtures multiple ’Patch Points‘, which you address separately in the Fixture Patch window.
For example, to patch the fixture with a scroller (of fixture type ‘Scroller Dimmer’) shown in Figure 5.3, “Examples of Fixtures requiring Multiple Patch Points”:
Setup → Patch : Open the Fixture window.
Fixture [Scroller Dimmer]
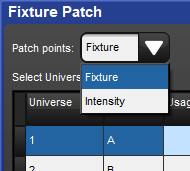
1@ : Opens the Fixture Patch window.Select the Fixture Patch Point (for the scroller) from the drop down list in the top right corner of the Fixture Patch window:
Click DMX 2 to select the second DMX universe.
[501]Enter : Enter the DMX address for the scroller.Fixture [Scroller Dimmer]
1@ : Opens the Fixture Patch window again.Click DMX 4 to select the fourth DMX universe.
Select the Intensity Patch Point (for the dimmer) from the drop down list.
[2]Enter : Enter the DMX address for the dimmer.
In the Fixture window, these types of fixture will span more than one row - one for each Patch point; see Figure 5.4, “A Fixture with Multiple Patch Points”.
Cloning a Universe will copies all of the fixture patch points and associated with the selected universe to another universe.
To clone the patching of one universe to another:
Setup → Patch → Universe View : open the Fixture window in Universe View.
Select the universe to clone by clicking on the column in the spreadsheet. The selected universe is highlighted in blue.
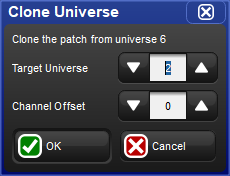
Press Clone Universe. The Clone Universe window will open; see Figure 5.5, “The Clone Universe window”.
Select a destination universe. Click on OK when you have finished.
If cloning will overwrite patch information in the destination, you will be asked for confirmation. The console will only unpatch previous fixtures that are in the way of new ones; the rest of the destination universe will be untouched.
![[Tip]](../images/tip.png) | Tip |
|---|---|
You can also move patching from one universe to another by cloning the patch to the new universe, and then unpatching the old universe; see Unpatching Fixtures from DMX Channels. |
You can unpatch a fixture in order to re-patch it with a different start address, or to stop output being sent to it. Unpatching does not erase any programming for the fixture in groups, palettes, cues and so on.
There are two ways to unpatch. Unpatching by fixture removes all patching information for that fixture, even if it has been patched to several start addresses or has multiple patch points. Unpatching by start address only unpatch a specific start address, leaving other start addresses associated with the fixture intact.
To unpatch all patch information associated with a fixture:
Setup → Patch : open the Fixture window.
Select the fixture by clicking on it, then press Unpatch at the top of the Fixture window. This un-patches the fixture, but leaves all programming for the fixture intact.
To unpatch a specific DMX start address change the Fixture window to Universe View.
Setup → Patch : open the Fixture window.
Universe View : change the Fixture window to Universe View.
When Universe View is selected, the Unpatch @ button is available on the top toolbar of the Fixture window. To unpatch start address 200 in the currently selected DMX universe (highlighted in blue):
Unpatch @
200
To unpatch several start addresses:
Unpatch @
2/200 + 3/300
To unpatch a range of start addresses:
Unpatch @
200Thru300: un-patches all start addresses between 200 and 300.
To unpatch an entire universe:
Click or press on the universe to unpatch, so that it is highlighted in blue.
Press Unpatch Universe at the top of the Fixture window and confirm that you want to unpatch.
Hog 4 OS supports direct control (via FixtureNet) of a variety of Ethernet based video switching devices as listed below:
Barco MatrixPro-II SD/HD/3G-SDI 8x8, 16x16, 32x32
Blackmagic Smart VideoHub 12x12, 20x20, 40x40
Lightware MX 4x4, MX 6x6, MX 8x4, MX 8x8, MX 9x9, MX 12x12, MX 16x16
AJA KUMO 16x16, 32x32
Each of these devices utilizes its own proprietary IP protocol for remote control, however, each device is patched and configured using the same Hog 4 OS procedure described below.
To patch and configure a video protocol fixture:
Setup → Patch : this opens the Fixture window.
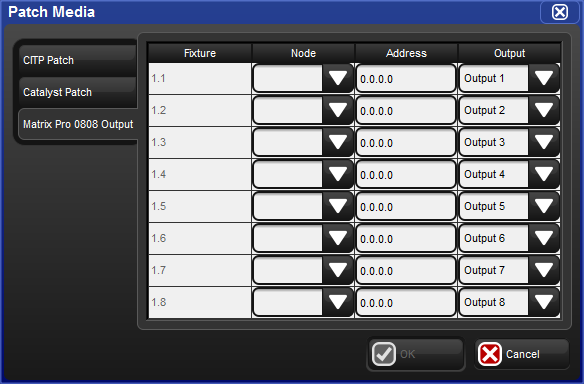
Press the Patch Media button located at the top of the fixture window.
Select the dedicated tab for the video switcher type to be patched. If a dedicated tab for the video switcher is not shown in the media patch window, then the video switcher fixture has not yet been scheduled in the show.
Fill in the appropriate data for each of the listed fixtures and press okay. See below for addition info:
Node: the DP8000 whose FixtureNet port is connected to the same network as the video switcher's network port
Address: the IP address of the video switcher
Output: the physical output on the video switcher that the fixture will control
![[Caution]](../images/caution.png) | Caution |
|---|---|
Hog 4 PC supports the patching of video protocol devices but does not support their control via the local Ethernet adapter. Control of video protocol devices is supported on consoles and external DP8000s only. |
