
Concert supports configuration of One-Port, Two-Port and Four-Port Gateways. To configure a Gateway device that is present in the configuration:
The DMX Gateway Configuration Editor displays for port configuration.
When adding a Gateway to the configuration from the device library, drag and drop the Gateway device from the Gateways tab into the Workspace or Spreadsheet view. The device icon displays in the Workspace or in the Spreadsheet view.
Note: When adding a device to the configuration from the device library using drag and drop, Concert by default adds the device's with its latest software version device package into the configuration. To specify a different software version for the device, drag the device from the device library, then press and hold the CTRL button before releasing the device into the Workspace or Spreadsheet view. A "Choose Device Version" dialog displays for specification of the installed device package to be used in the configuration.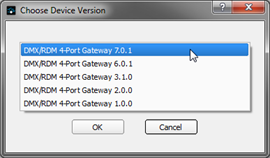
Only installed device packages display in the "Choose Device Version" dialog. To install a different device package for the device, reference the Component Manager.
Actions are available from the context menu of a selected Gateway from the Workspace or Spreadsheet views. Right-click on a Gateway and select from the available actions in the list:
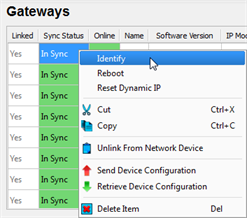
Selecting "Identify" from the Gateway context menu sends a command to the Gateway to flash its backlight (Two-Port and Four-Port Gateways only) or flash its LED (One-Port Gateway) for 60 seconds. The "Identify" option will be disabled from selection if the Gateway is offline.
Selecting "Restore Defaults" from the Gateway context menu allows restoration of the Gateway settings to factory defaults. A warning dialog will display for confirmation of the restore action. The "Restore Defaults" option will be disabled from selection if the Gateway is offline.
Selecting "Reboot" from the Gateway context menu reboots the selected Gateway. The "Reboot" option will be disabled from selection if the Gateway is offline.
Selecting "Restart RDM Discovery" from the Gateway context menu causes the Gateway to forget the RDM devices that it currently knows about and performs a rapid discovery cycle on all of its ports to rediscover devices. The "Restart RDM Discovery" option will be disabled from selection if the Gateway is offline.
Selecting "Reset Dynamic IP" from the Gateway context menu erases the memory of the current dynamic IP address setting for the selected Gateway and requests a new IP from an online DHCP server after reboot. The "Reset Dynamic IP" option will be disabled from selection if the Gateway is offline.
The link state of a device indicates whether the device in the configuration is linked to (associated with) an online network device. When the Gateway is associated with an online device, "Unlink From Network Device" displays in the context menu. When the Gateway is not associated, "Link to Network Device" displays in the context menu.
Reference Link to Network Device for more information.
Select "Retrieve Device Configuration" to retrieve device configuration data from selected linked and online Gateway. This action overwrites the Gateway configuration in Concert with the new retrieved device configuration data from the online device. A "Retrieve Device Configuration" dialog displays for confirmation of the configuration update . Click [Yes] to send the configuration or [No] to abort the network device configuration overwrite.
Select "Delete Item" from the context menu to delete the selected Gateway from the configuration.
Tip: When Concert is connected to a networked system, and the deleted device is discovered, it will display in the "Unlinked" tab of Discovered Devices.
With the DMX Gateway Configuration Editor displayed, Port Configuration of the selected Gateway is possible. The available ports of the selected Gateway are displayed with representative images for the connector types that Concert has detected. When the selected Gateway is a One-Port, only one port is selectable and configurable.
VIDEO TUTORIAL: Click here to view an overview video tutorial showing how to configure a Gateway. To view the video tutorials, you must have installed an MP4 compatible video player, such as QuickTime.
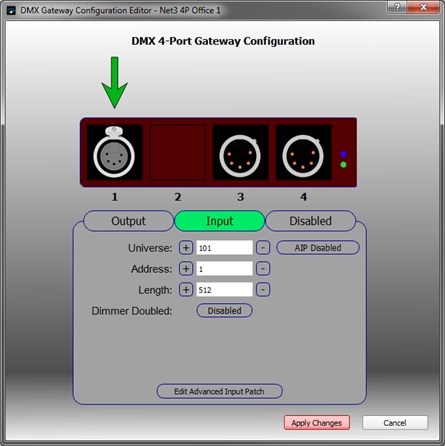
To select a port for configuration, click on the port. A green arrow displays above the selected port and the current configuration details of the selected port displays in the dialog. With the port selected, you may choose to specify the port as an output, input, or disable the port.
If your gateway contains a Serial port, the Serial properties appear in the Gateway Editor:
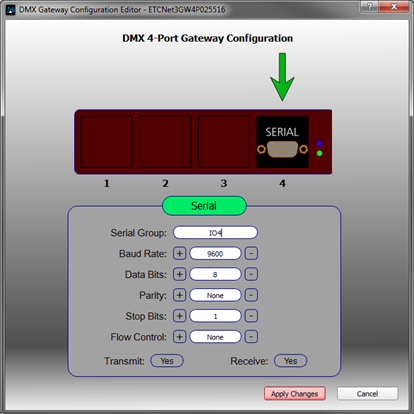
Using the editor, you can configure the Serial Group, Baud Rate, Data Bits, Parity, Stop Bits, and Flow Control for your serial port.
Additionally, you must select the values for Transmit and Receive. Set Transmit to Yes if there is serial data being sent over the network that should be routed to the device connected to the Serial port. Set Receive to Yes if there is serial data being sent to the port from the connected device which should be sent over the network.
For additional information on sending or receiving serial data to or from an EOS console, refer to your EOS Family Show Control Setup Guide.
Click "Output" to configure the selected port as an output. With a port configured as an output, the following items are presented for configuration :
Note: Dimmer doubling and RDM features are not supported on a one port gateway.
Gateways offer two input patch modes, Standard and Advanced.
With a port configured as an input and standard patch, the following items are presented for configuration:
Note: Dimmer doubling is not supported on a one port gateway.
With a port configured as an Input and "Advanced Input Patch" selected, the Edit Advanced Input Patch dialog displays for patch specification:
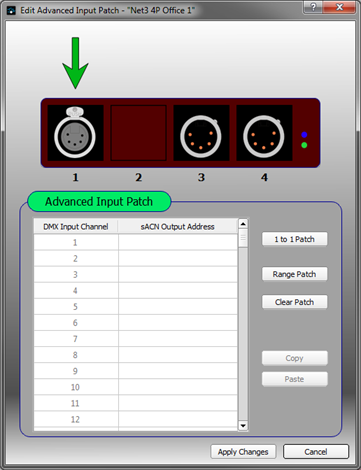
Click on the port for advanced input patch configuration. The selected port displays with a green arrow on top.
The patch table includes two columns of data in the table:
Note: When the sACN output address format provided is invalid, the cell displays with a pink background. Correct the error by supplying the correct universe/address format. Concert will not apply the changes or close this dialog with an invalid patch.
Click the DMX Input Channel column header to sort the table channel column data ascending or descending.
To create a one to one patch for the selected port, click the [1 to 1 Patch] button to display the 1-1 Patch dialog.
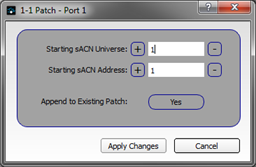
The one to one patch dialog provides the following options:
Range patching allows you to quickly patch a group of channels to the selected port. Click the [Range Patch] button to display the Range Patch dialog.
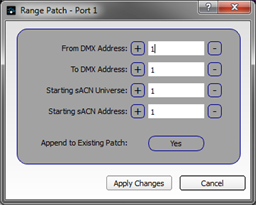
The range patch dialog provides the following options:
To clear only one or more selected rows in the patch table, select the rows fist, then click the [Clear Patch] button. If no specific rows are selected, press the [Clear Patch] button to clear all patch data for the selected port.
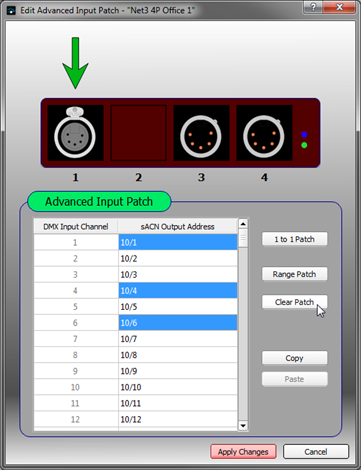
Concert offers the ability to [Copy] advanced input patch data from the currently selected cell(s) in the patch table (port specific) and [Paste] that data to another port. Data copied for the selected cell(s) are formatted "DMX Input Channel" <tab character> "AIP Data", for as many cells as are selected when the copy operation is made. Data on the clipboard can be pasted into the new port selection.
For example:
Tip: You must click the [Apply Changes] button to close the Gateway editor and process the changes.
When a port is disabled, there are no editable settings.