Similar to Excel spreadsheets, many windows in the Hog 4 OS such as the programmer, output window, and cue editors are presented as spreadsheets.
All of the spreadsheets in the Hog 4 OS share a common set of features:
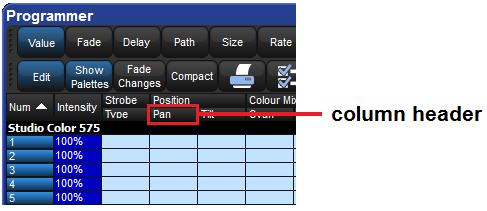
To resize a spreadsheet column: Place the cursor over the right-hand edge of the column header. The cursor will change to a double-ended arrow. Click and drag to resize the column.
To move a spreadsheet column: Click and drag on the column header.
To hide a spreadsheet column: Right-click on the column header, and choose Hide.
To show a hidden spreadsheet column: Right-click on a column header, and choose the name of the column from the menu.
To sort the spreadsheet: Right-click on a column header and select Sort to sort the spreadsheet by the values in that column. Select Sort again to the reverse the direction of the sort. You can also right-click on a column header and select Sub-sort to assign a second level of sorting. For example, if you sort the Fixture window by fixture type, and sub-sort by Patch, then all the Desk Channels will be shown grouped together, in the order of their patch address.
To select all the cells in a spreadsheet column: Double-click on the column header at the top of the spreadsheet.
To select a single spreadsheet cell: Click or press in the cell. You can use the cursor keys below the Trackball to change which cell is selected. If the cell is editable, it will have a red border.
To select a range of cells in a spreadsheet: You can click or press and then drag across a range of cells to select them all. Alternatively, you can click in the first cell, press and hold Thru, and click in the last cell; this is useful if you want to select a large range and need to scroll the window.
To edit the contents of cells in a spreadsheet: Click or press in the cell and press the Set key, or double-click in the cell. Type in the new value, and press Enter. This works for both a single selected cell and a range. Cells that are editable have a red border when selected. Cells labeled Colour in cuelists and scenes will open the colour selection dialog to allow you to colour code the cell.
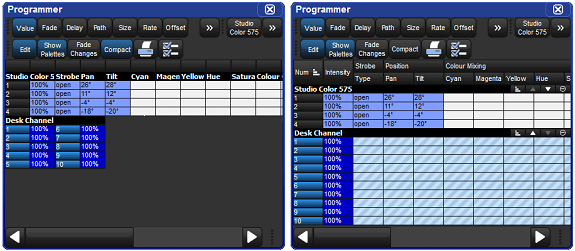
In editor windows such as the Programmer, you can use compact mode to save space and get more information onto the screen without having to scroll; see Figure 2.7, “A spreadsheet with and without Compact Mode”. In compact mode, fixtures only have columns for the actual parameters that they have, rather than for all the parameters of any fixture in the editor. The console uses the display space more efficiently by having multiple columns for fixture types with few parameters, such as desk channels.
You can toggle compact mode on and off with the Compact button in the window's toolbar.
Note that you cannot sort a spreadsheet that is in compact mode.
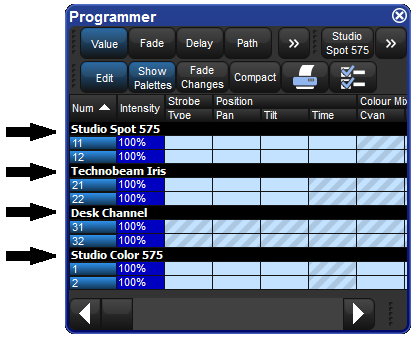
In windows such as the Programmer, it is often useful to keep fixtures of the same type together; this is known as ‘aggregation’. The spreadsheet effectively becomes a list of fixtures in fixture type order, with headings in the list separating each fixture type; see Figure 2.8, “A Spreadsheet with Aggregation Turned On”.
To use aggregation:
Make sure the spreadsheet is sorted by Fixture Type: right click on the Type column and select Sort. If the Type column isn't visible, right click on any column heading and select Type.
Press
 to open the Configuration window.
 Select Enable Aggregation.
Click on OK.
Note that aggregation is always on if the spreadsheet is in compact mode; see Compact Mode.
![[Tip]](../images/tip.png) | Tip |
|---|---|
Aggregation is turned on by default in all editors, such as the Programmer. |
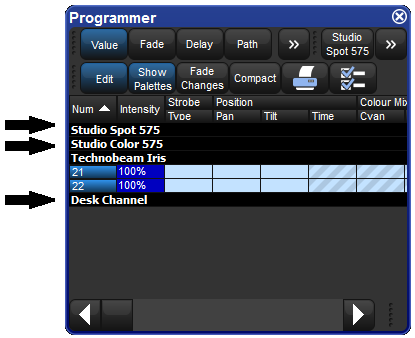
You can collapse aggregated sections to hide all the rows in that section; see Figure 2.9, “An Aggregated Spreadsheet With Collapsed Rows”. To collapse an aggregate section, right click the black heading bar and select Collapse.
To expand the aggregation section again, right click the section's black heading bar and select Expand.
You can change the position of an aggregation section in the list by altering its priority. Raising a section's priority will make it appear nearer the top of the spreadsheet.
To move an aggregate row up or down in priority, right click the section's black header bar and then select Raise Priority or Lower Priority.
You can quickly bring aggregated sections into view using the Jump Toolbar located on the upper right of a spreadsheet window, see Figure 2.10, “The Jump Toolbar”. This has a button for each aggregation section; clicking a button will scroll the list to bring the section into view.
To enable the jump toolbar:
Press
 to open the Configuration window.
Select Enable Jump Toolbar.
Click on Apply.
![[Tip]](../images/tip.png) | Tip |
|---|---|
The jump toolbar is turned on by default in all editors, such as the Programmer. |


