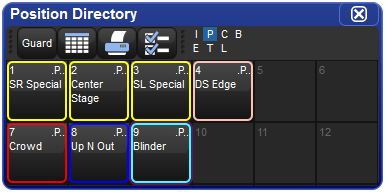
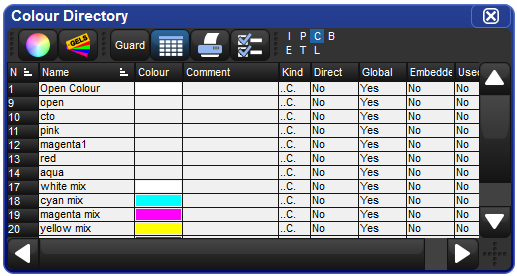
Palettes help to simplify the programming process by allowing pre-defined lighting ‘elements’ to be created and then used as required. Once you have created a palette, such as a particular set of position settings with moving lights, you can recall those settings instantly, and record them into cues. Palettes are stored in windows called directories.
A great advantage of palettes is that when you record a cue using the palette, the cue contains a reference to the palette, rather than the parameter values that the palette contains. If, later, you change the palette then all cues that have been recorded using the palette are also changed. This is especially useful if, for example, the position of a piece of set on stage is moved, and moving lights have been programmed to light it. The palette can be updated once to accommodate the change, rather than in every cue. For more information, see Palettes.
Palettes allow intensity, position, colour and beam parameters to be recorded as easily accessible ‘building blocks’ to be used when programming. Palettes are stored in classified directories. For information on directories see Directory Windows
When you use a palette to assign parameter values in the Programmer, and then record the contents of the Programmer as a scene or cue, the Hog 4 OS records a reference to the palette rather than numerical values for the parameters. During playback, the console refers to the parameter values stored within the palette when outputting cue data to the stage. Because of this referencing, when you modify a palette's content, the cues and scenes that were programmed using it will, in effect, be automatically updated with the new values. The palette is said to be ‘referenced’ in the cue. This is a very powerful feature that allows you to make global changes to the show very simply and quickly, rather than having to re-program every cue individually.
If you wish to make a palette that is just a programming tool, where later changes to the palette will not cause cues, scenes and other palettes recorded with it to be updated, then you can use direct palettes. With direct palettes, actual parameter values are placed into cues, rather than references. See Direct Palettes.
![[Tip]](../images/tip.png) | Tip |
|---|---|
Hog 4 OS can automatically generate a useful set of palettes based on the fixtures in your show: see Creating Palettes and Groups Automatically. |
Directory windows give you quick access to groups, palettes, scenes, cuelists and so on, and they all work in essentially the same way.
| Display | Applies To | Description |
|---|---|---|
| . . C . | Palettes | Shows the parameter types recorded in the palette. I = intensity, P = position, C = colour, B = beam, E = effect, T = time. See Recording Palettes with Kind Masking. |

| Palettes | The palette is a direct palette. See Direct Palettes. |

| Palettes | The palette contains references to other palettes. See Reference Palettes. |

| Palettes | The palette is the Highlight Palette. See Customising Highlight. |

| Palettes | The palette is the Lowlight Palette. See Customising Highlight. |

| Cuelists | The cuelist is a chase. See Using a Cuelist as a Chase. |

| Cuelists | The cuelist has timecode active. See MIDI. |

| Cuelists | The cuelist has clock triggers that are enabled. See Clock Triggers. |

| Pages | The page is the template page. See The Template Page. |

| Pages | The page has a Restore Activity macro defined. See Restoring Activity When Changing Pages. |
You can rename the selected button (with the red border) by pressing the Set key. You can also hold Set and press any button to rename it.
At the top of the window there are four buttons common to all directories:
|
|
Switches the directory to a spreadsheet view. |
|
|
Prints the contents of the window. |
|
|
Configure allows you to control various aspects of how the directory window displays information. |
|
|
When guard is enabled the buttons in the directory will not activate when touched but rather token on the command line. |
![[Tip]](../images/tip.png) | Tip |
|---|---|
You can override the effect of the Guard button by holding down the Pig key while pressing a directory button. |
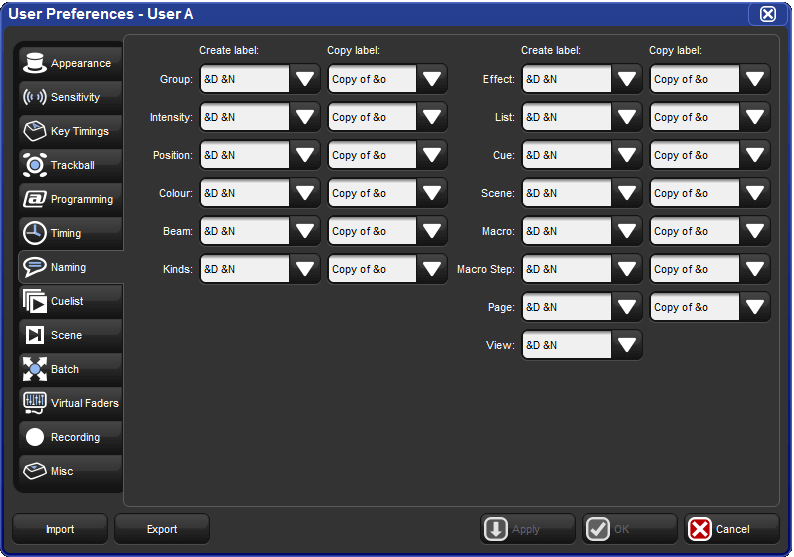
When you create or copy a directory item, the console automatically generates a name for the new item. For example, if you have two position palettes and them create a third, the new one will be recorded into location 3 in the directory and named ‘Position 3’. If you then copy this position palette, the copy will be recorded into location 4 in the directory and named ‘Copy of Position 3’.
You can customise how the console automatically generates these names in the Default Naming pane of the User Preferences window; see Figure 2.6, “The Default Naming pane of the User Preferences window”. To open the Default Naming pane:
Setup → Preferences → Default Naming
To customise the generated labels:
Click or press on the text box for the required type of directory (group, intensity, position, and so on). Labels for when the new directory item is created by recording or by copying are handled in separate text boxes.
Set,
[new label text], Enter : type in the label you want.Alternatively, click or press on the arrow at the right hand end of the text box to get a list of useful labels. Click on the one you want.
You can use special tags to have the console insert text into the name for you, according to the directory name and the location in the directory:
&d: the directory name
&D: the directory name (dynamic)
&n: the directory number
&N: the directory number (dynamic)
&o: the original text. This is used when a directory item is copied; the original text is the name of the item that has been copied.
Lowercase tags are resolved once only, when the name is applied, while uppercase tags remain unresolved until the name is displayed (known as ‘dynamic’). So, pressing Set and entering the name of colour palette 3 as ‘&d &n’ will assign the name to be ‘Colour 3’. If you assign the name to be ‘&D &N’, the name will also be assigned to ‘Colour 3’. The difference is that moving this palette to position 4 will automatically correct the name to ‘Colour 4’.
Each directory window allows for unique colour coding of each button within the directory. The default colour for new directory items is standard grey. When you copy a directory item, the console will automatically copy the directory item's custom colour as well.
Note: The playback bar, view toolbar, and commands keys automatically reflect the color-coding of the objects that they display. Color-coding for these objects can only be changed in the directory and the is thus reflected everywhere that object is shown.

To customise a directory item in button view:
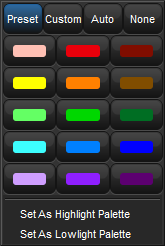
Using the mouse, right click on the directory button to open the right click menu.
Click on one of the 15 options to assign the directory item this colour.

Alternatively, click on Custom to select a custom colour from a colour wheel or click None to select the standard grey colour. Click on Auto to have palettes in the Colour directory automatically determine the button color based upon the dominate colour value recorded in the palette.
To customise a directory item in spreadsheet view:
Select the Colour cell and press Set to open the colour selection menu.
Click on one of the 15 preset colours to assign the directory item this colour.
Alternatively, click on Choose to select a custom colour from a colour wheel or click None to select the standard grey colour. Click on Auto to have palettes in the Colour directory automatically determine the button color based upon the dominate colour value recorded in the palette.
![[Tip]](../images/tip.png) | Tip |
|---|---|
You can select multiple buttons or cells by clicking and dragging to assign the same colour to multiple items. |


