There are several ways in which you can tell the status of the console's output:
The status of masters is shown by the playback control key LEDs and the on-screen Playback Bar.
You can use a master window to follow the progress of running cuelists.
The total output of all fixtures' parameter values is shown in the Output window, and the total output of all fixture's intensities is shown in the Levels View window.
The LEDs of the playback controls give information about the cuelist's status:
Go key (Green): When solidly lit, indicates that a forward crossfade is in progress. When flashing, indicates a forward crossfade has been paused.
Halt/Back key (Red): When solidly lit, indicates that the master is active and controlling parameters. When flashing slowly, indicates that its control of parameters has been overridden by other playbacks. When flashing quickly, indicates the master is releasing.
PlayBackwards key (Green): When solidly lit, indicates an active crossfade to the previous cue. When flashing, indicates that a crossfade to a previous cue has been paused.
Flash key (Red): When solidly lit, indicates that this playback is controlling intensity. When flashing, indicates that its control of intensity has been overridden by other playbacks.
Playback Bars are typically displayed at the bottom of the left touchscreen and give feedback for the objects assigned to each physical master; see Figure 17.7, “The Playback Bar”. For each master, the Playback Bar displays the following information:
If a master is empty, its master number is shown.
The number and name of the cuelist, scene, group, or batch assign to the master. This is shown in blue if the master has been held over after a page change; see Options When Changing Page.The name and number will appear in lavender if the master is from a template page; see The Template Page.
For lists: the current cue and its overall time followed by the next few cues and their times. If you want to see more cues, click and drag the top of the Playback Bar upwards to make it larger. When a cue in a list is crossfading, it is displayed in green text and the time counts down. If the cuelist has been released, then .... is displayed, with the next cue shown below.
For scenes: the scene and its overall time. When a scene is cross-fading, it is displayed in green text and the time counts down. If the scene has been released, then .... is displayed, with the scene name shown below.
For groups: the text "Group" will be written in the master cell. Groups assigned to the playback bar are commonly referred to as Inhibitive Masters as they can inhibit the intensity of all fixtures in that group based on the master's fader level.
For batches: individually numbered cells that represent the lists and scenes assigned to the batch will appear inside the batch's playback bar display. Lists are represented solely by a number whereas secens are marked with an "s" before the number. The running state of each list and scenes is then indicated by the background color of the cell.
Each master's fader level. If the fader is below 100%, then a red bar appears indicating the level. It is possible for the position of the physical fader to be different to the master level of the cuelist, in which case the vertical bar will be blue; see Matching Levels When Changing Page.
If the cuelist is a chase. If it is, then its rate in BPM is shown; see Using a Cuelist as a Chase.
Options set for the cuelist will appear at the bottom of master on the playback bar. The symbols used are shown in the table below:
| Symbol | Description |
|---|---|

| The cuelist is working under the HTP rule. |
|
|
The cuelist is set to Persist on Override. See Changing a Cuelist's Priority. |
|
|
The cuelist is set to Release on Other Go. See Releasing on Another Go. |
|
|
The cuelist has a high priority. See Changing a Cuelist's Priority. |
|
|
The cuelist has a low priority. See Changing a Cuelist's Priority. |
|
|
The scene uses the master as an IPCB fader. Note that this applies to scenes only. |
|
|
The cuelist uses the master as a manual fader. See Manually Cross-fading Cuelists. |
Multiple Playback Bars can be displayed using the Wings pane of the Control Panel or using the front panel shortcuts mentioned in Adding Playback Wings. Once a playback bar is displayed on the desktop it can be dragged to different locations on the display by clicking and dragging on the drag handle on the left hand side of the playback bar. The recommended location for a playback bar is at the bottom edge of the display as it helps to associate the playback bar with the physical controls of the wing that is located under the display.
You can also click and drag on the outside edges of the Playback Bar's master area to better align the playback bar's masters to the physical masters on the hardware.
For information on adding and setting up playback wings, see Adding Playback Wings.
The master window for a cuelist shows all of the cues in the cuelist as well as their running state. (see Figure 17.8, “The Cuelist Window with a Cue Running”):
Open + Choose
Or:
Double click the Playback Bar above the required cuelist.
Or:
Open + [List 1] : select the cuelist from the cuelist directory.
The current cue is indicated by an arrow in the wait column and a light blue background across the entire cue row. When a cue is triggered the arrow turns green and the letter R(for Running) is displayed; the cue's progress is indicated by the percentage completed in the same column. Pausing a cue will turn the arrow red and the letter H(Halted) is displayed.
There are several view options selected by buttons at the top of Cuelist window:
Play Controls: displays alternative play controls at the top of the Cuelist window. These are useful for running virtual masters, see Using the Play Controls Toolbar to Play a Cuelist, Scene, or Batch.
View Cue: opens the current cue (as denoted by an arrow in the wait column) in an editor.
Follow Cue: selecting Follow Cue from the top of the Cuelist window will make the list of cues scroll to keep the current cue in view as the cues are played back.
Follow Chosen: during playback, you may not want to have multiple Cuelist windows open. Select Follow Chosen from the top of any Cuelist window so Hog 4 OS automatically displays the cuelist of the currently chosen master. If Follow Chosen is off, the same cuelist will always be shown in the window irrespective of the chosen master.
View Timecode: turn the display of timecode information on or off.
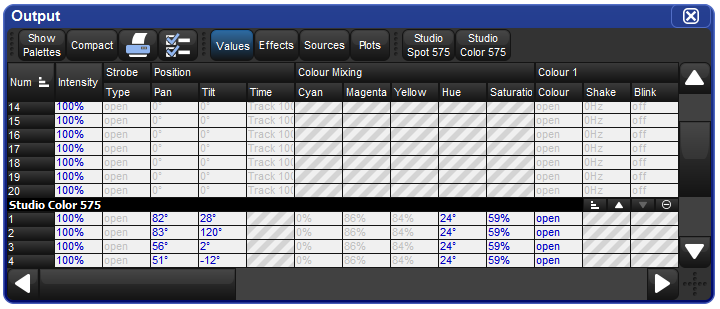
The Output window displays the output value of all parameters controlled by Hog 4 OS from all cuelists, virtual cuelists, scenes, the Programmer and other editors, and parked parameters. It provides an accurate indication of the status of shared parameter values when multiple cuelists are running simultaneously; see Figure 17.9, “The Output Window”.
To open the Output window:
Press and hold the Open key, then select Output from the Main Toolbar.
Or:
Select Output from the View Toolbar at the top of the left hand touchscreen.
The Output window by default displays raw parameter values; you can configure it via buttons at the top of the window to display output information in the following ways:
Values: displays the raw parameter values.
Effects: displays the base value before the effect is applied, along with a percentage indication of the effect cycle.
Sources: displays the source that currently has control of a parameter, for example, the Programmer or a cuelist and cue number.
Plots: displays the name of the plot that has control of the parameter; if you want to see the real world value being calculated by the plot for the parameter then choose "value" instead of "plots"
Show Palettes: as with sources, displays the palette that is supplying the parameter value.
Compact: Compacts the display of information in the window; see Compact Mode.
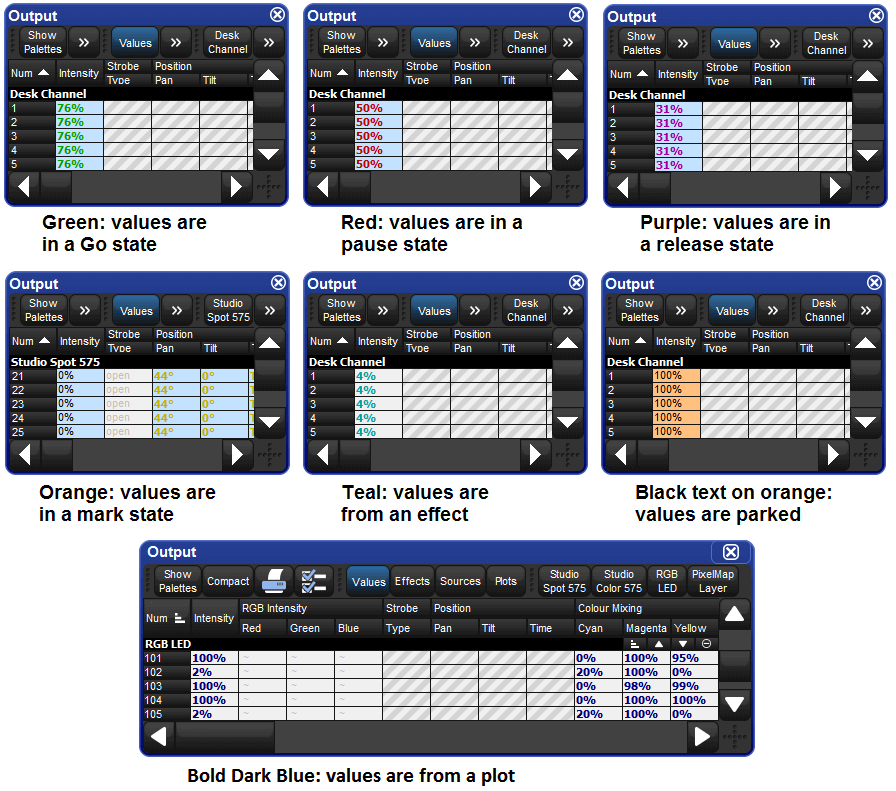
Cross-fading values will appear in the Output window in the following colors:
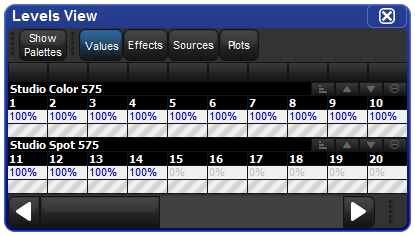
The Levels View window displays the output value of all intensities controlled by Hog 4 OS from all cuelists, virtual cuelists, scenes, the Programmer and other editors, and parked parameters. It provides an accurate indication of the status of shared intensity values when multiple cuelists are running simultaneously; see Figure 17.10, “The Levels View Window”.
To open the Levels View window:
Press and hold the Open key, then select Levels from the Main Toolbar.
The Levels View window by default displays raw intensity values; you can configure it via buttons at the top of the window to display output information in the following ways:
Values: displays the raw parameter values.
Source: displays the source that currently has control of an intensity, for example, the Programmer or a cuelist and cue number.
Plots: displays the name of the plot that has control of the parameter; if you want to see the real world value being calculated by the plot for the parameter then choose "value" instead of "plots"
Show Palettes: as with source, displays the palette that is supplying the intensity value.
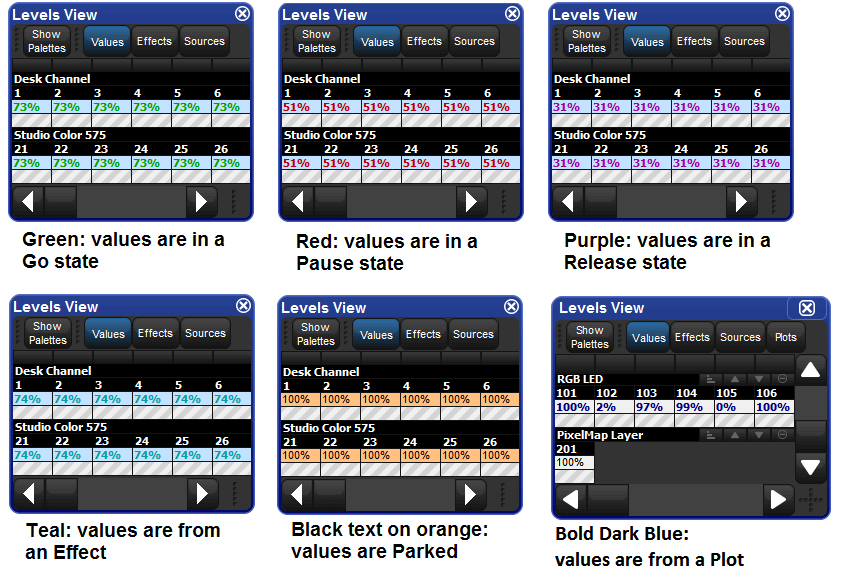
Cross-fading values will appear in the Levels View window in the following colors:


